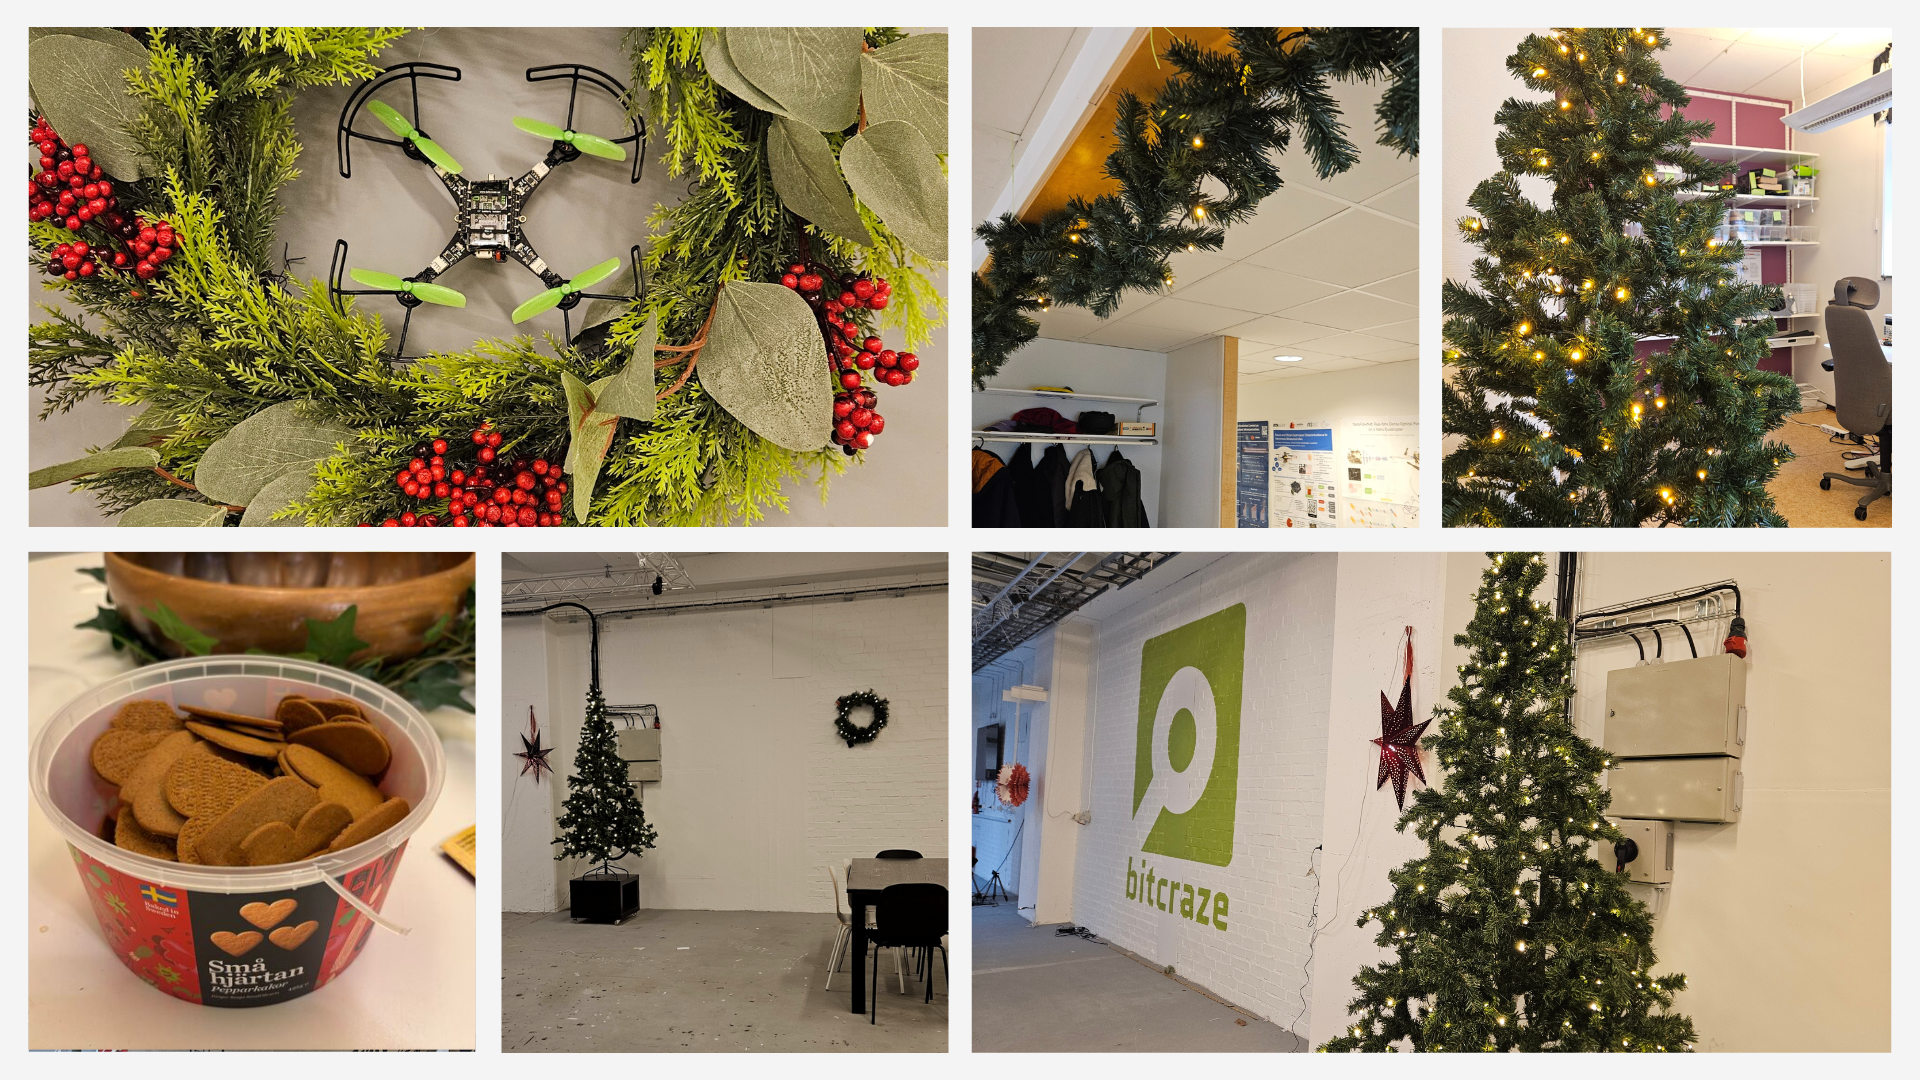
November is always a tough month in Sweden, when the darkness deepens and the cold begins to bite. We had our first snow last week, a sudden reminder that winter has arrived. So instead of letting the gloom settle in, we decided to turn to what makes us feel good: pretty lights, pretty trees, and pepparkakor!
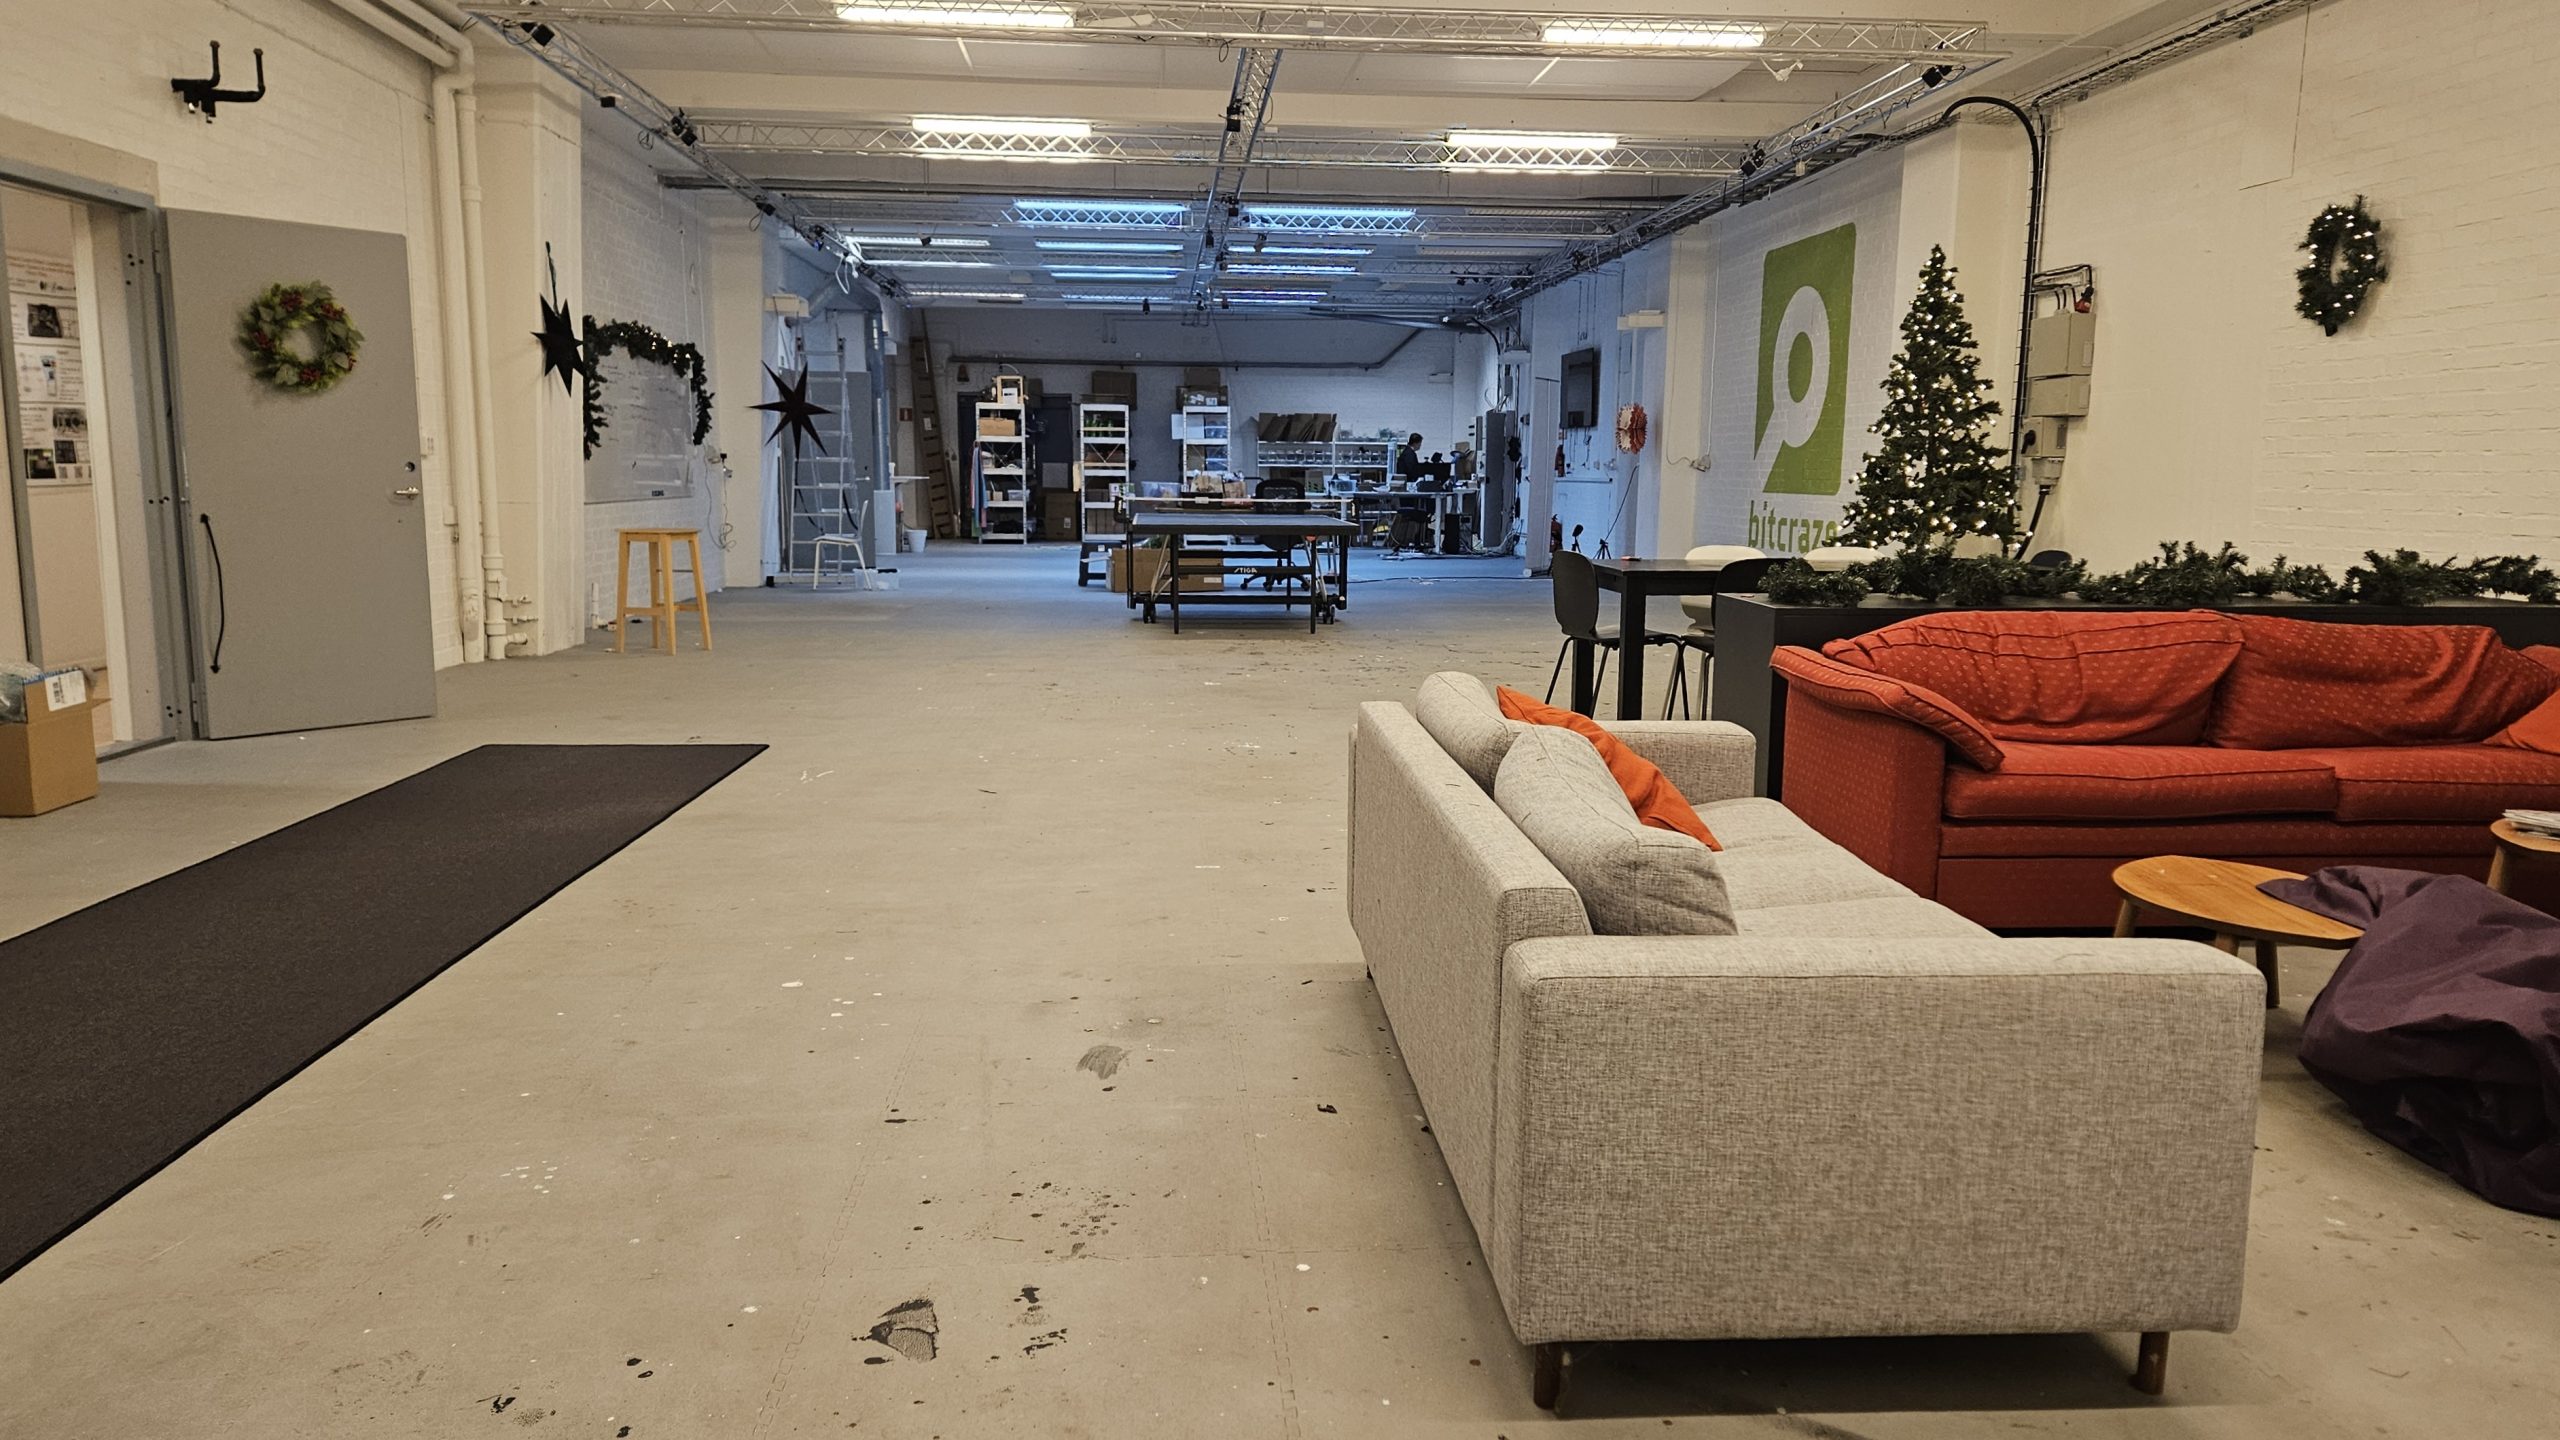
I realized that, although we talked about it last year, we never fully showed our big new flight arena once it was up and running. It made an appearance in our latest Christmas video, but was actually never fully revealed before. Capturing a 110square meters space in a single photo is no small feat, but here is my best shot:
It felt the right time to make the office feel a little more wintery. It may be a little early, but we couldn’t resist the charm of festive decorations and a cozy atmosphere to brighten up the dark days. Especially now that we’re more settled into our massive flight arena – a space this large calls for many more Christmas lights! Of course, there’s more to it than just creating a Netflix-Christmas-movie vibe—we’re also gearing up for two big events: our annual Christmas party, which will be hosted here, and the filming of our newest Christmas video!
Speaking of Christmas video, that’s exactly what we’ll be diving into during our next dev meeting! We recently had a great time revisiting how we’ve used demos to guide development – if you missed that particular dev meeting, you can see it here. We thought it would be a great idea to dedicate our next session to exploring all the Christmas videos we’ve created over the years. It’s fascinating to see how our Christmas projects have evolved over time and we hope you’ll join us to reminisce about it Wednesday 11th of December at 15.00 (CET). You’ll find all the info here.
It’s been a while since I last talked about hiring! We successfully onboarded our most recent recruit, and now it’s time to start planning for the future.
One of our challenges as a team is that we’re very heavy on engineers and developers. While that’s fantastic for building products, it means we lack expertise in other important areas. That’s why we’re now shifting our focus to bringing in talent to help fill those gaps. We’ve partnered with a recruitment agency once again to help us find the right people for the job. We’re currently hiring for two distinct roles—here’s what we’re looking for!
Technical sales lead
You will be responsible for developing and implementing sales strategies while exploring both new and existing markets. You’ll take the lead in driving sales and acquiring new customers, becoming the company’s go-to expert on marketing and sales tactics. Your day-to-day tasks will include supporting business development, optimizing sales processes, and proposing effective marketing strategies. This role is perfect for someone with a background in technical sales with a strong strategic mindset and a sense of responsibility.
We’re looking for a Technical Success Engineer to provide our customers with technical guidance and product expertise. This role involves offering first-line support, creating documentation and tutorials, and assisting with tech-focused sales efforts. The goal is to ensure a smooth and seamless customer experience while building strong client relationships. It’s an ideal position for a “social developer”—someone with a solid technical background who also excels in communication and enjoys engaging with others.
Both positions are full-time and based at our office in Malmö, Sweden. If you’re curious about why you should join our team, I’ve already shared some of the many reasons why I love being part of Bitcraze.
If you’re interested or have any questions, please send an email to fredric.vernqvist@techtalents.se or contact us at contact@bitcraze.se.
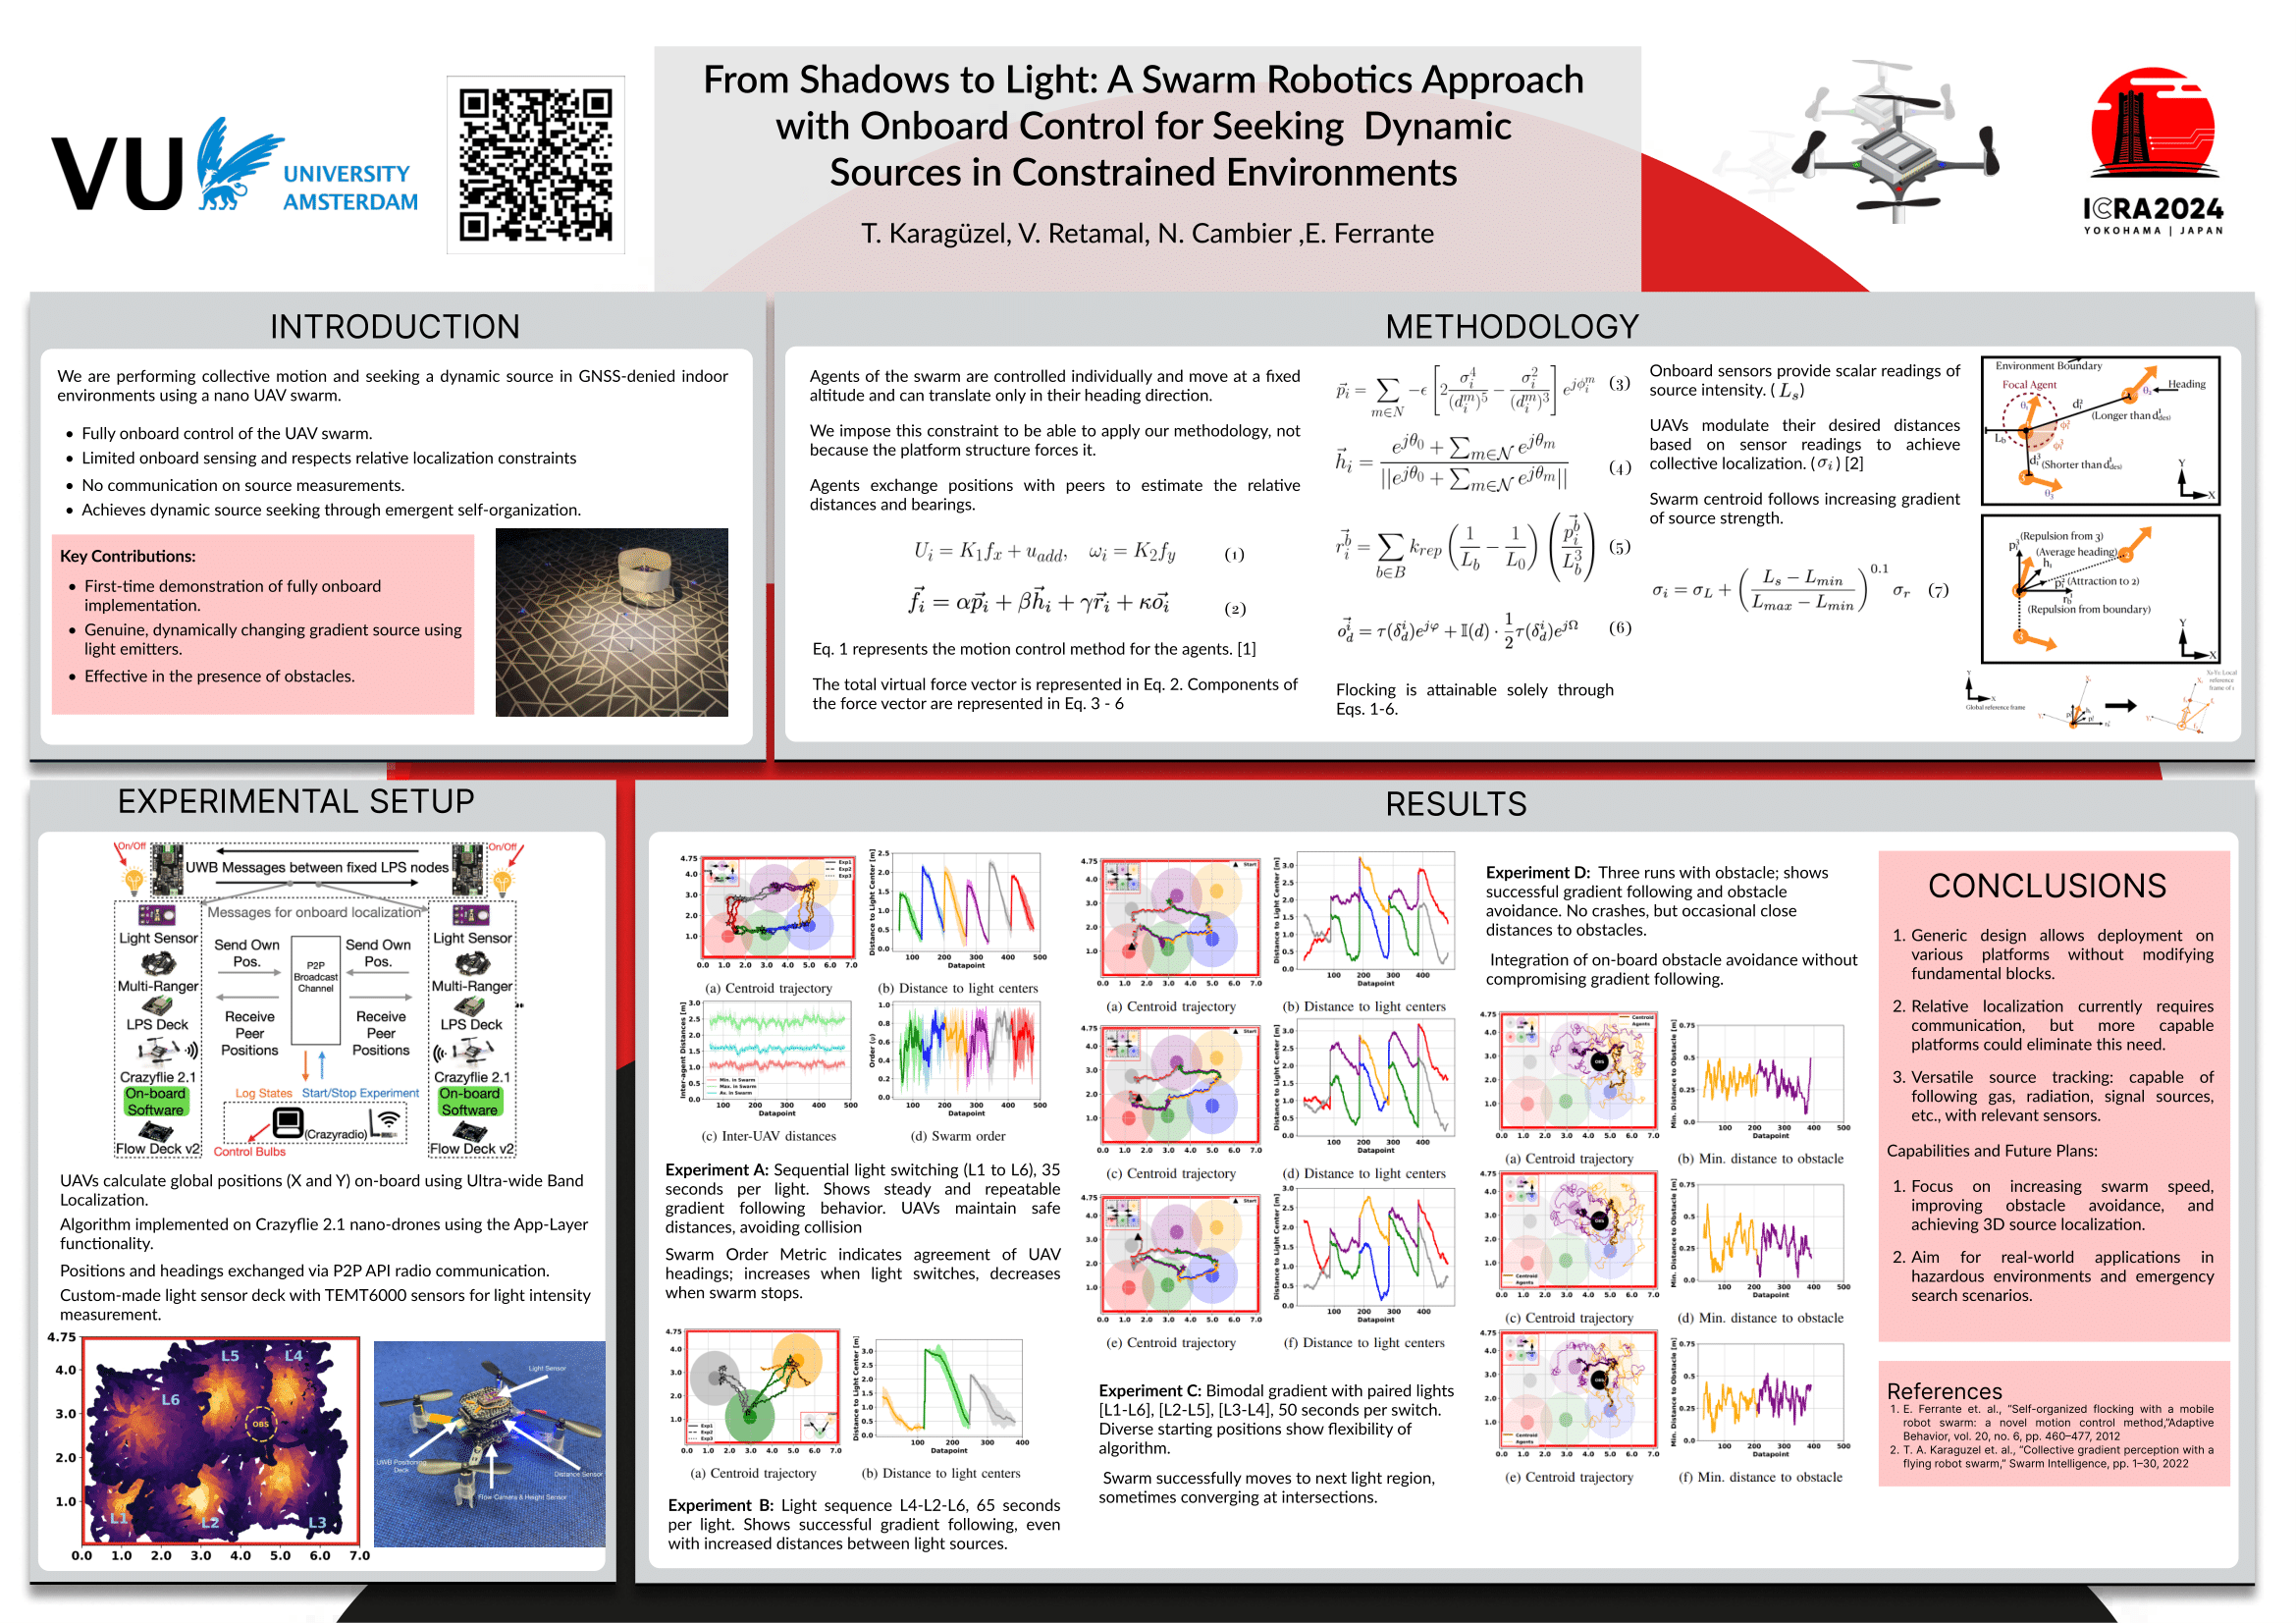
Today, we’re excited to share research from Vrije Universiteit Amsterdam, ‘From Shadows to Light,’ which presents an innovative swarm robotics approach where nano-drones autonomously track dynamic sources indoors.
Motivation
In dynamic and unpredictable indoor environments, locating moving sources—such as heat, gas, or light—presents unique challenges. GPS-denied settings, in particular, demand innovative and efficient onboard solutions for both control and sensing. Our research demonstrates how small drones, like Crazyflies, can be organized into a coordinated swarm to autonomously locate and follow these sources indoors, relying solely on onboard sensing and communication capabilities. Without sharing individual measurements, each drone adapts its behavior in response to its own sensor readings, allowing the swarm to collectively converge on the center of a light source through modified interactions with nearby agents.
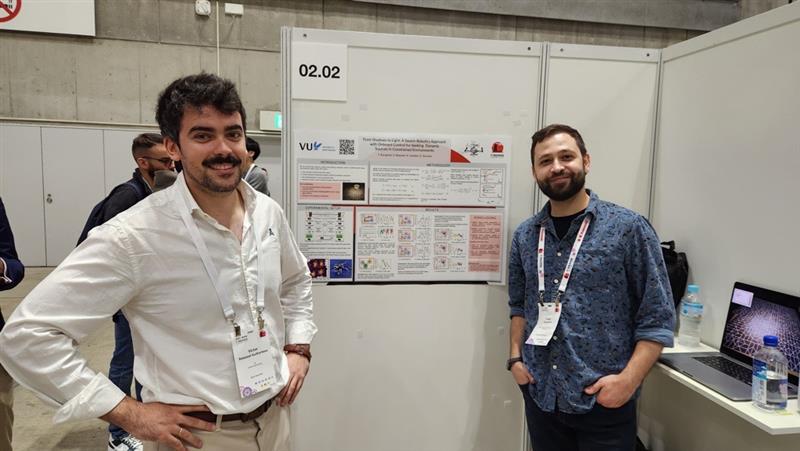
Tugay Alperen (right) and Victor Retamal (left) during ICRA 2024 poster session
Method
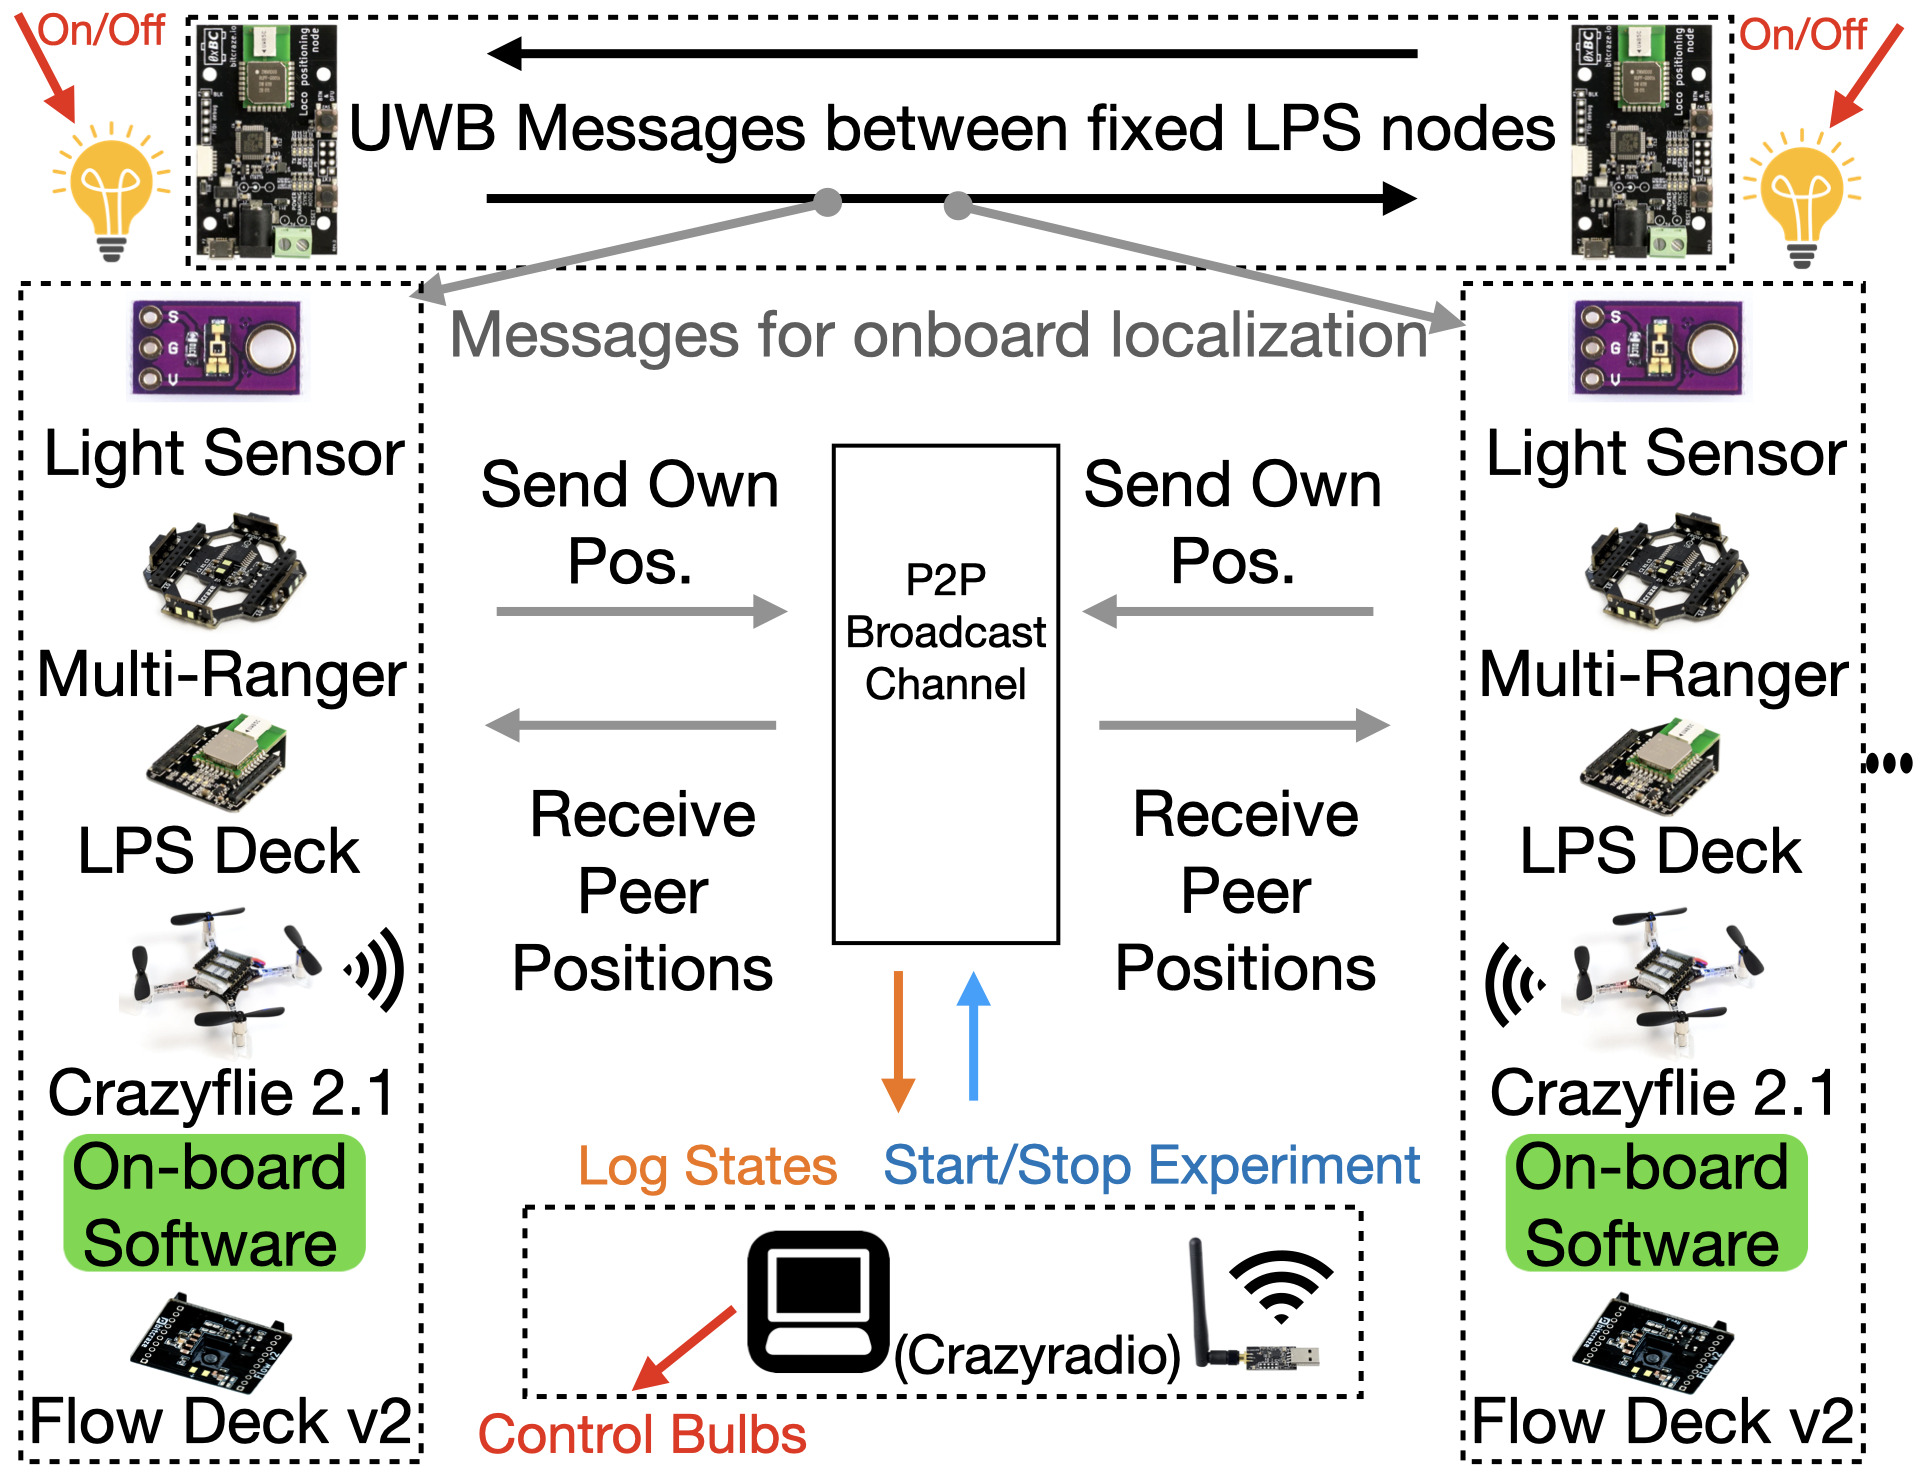
Our approach enables each Crazyflie to function autonomously, using onboard sensing combined with continuous inter-agent communication at a frequency of 20 Hz. This methodology is structured around three core components:
Proximal Control and Collective Motion
Each drone broadcasts its position to nearby agents, enabling the calculation of relative positions to maintain safe distances. This proximal control ensures cohesive group movement by computing virtual force vectors for velocity commands, which are sent to onboard controllers operating at 20 Hz.
Source Seeking Through Adaptive Social Proximity
Drones use custom light sensors to detect local light intensity. Instead of directly adjusting positions based on this measurement, each drone modifies its social proximity to neighbors according to the sensed intensity without broadcasting this information. This adaptation allows the swarm to collectively follow the light gradient toward the source in a decentralized manner.
Obstacle Avoidance
Equipped with time-of-flight sensors, each drone independently detects obstacles and adjusts its trajectory to maintain safety. This ensures the swarm remains intact while navigating toward the source.
By combining continuous relative positioning, virtual force-based control, individual sensing, and adaptive social behavior, our methodology provides a robust framework for efficient source seeking in GPS-denied indoor environments.
Experimental Setup
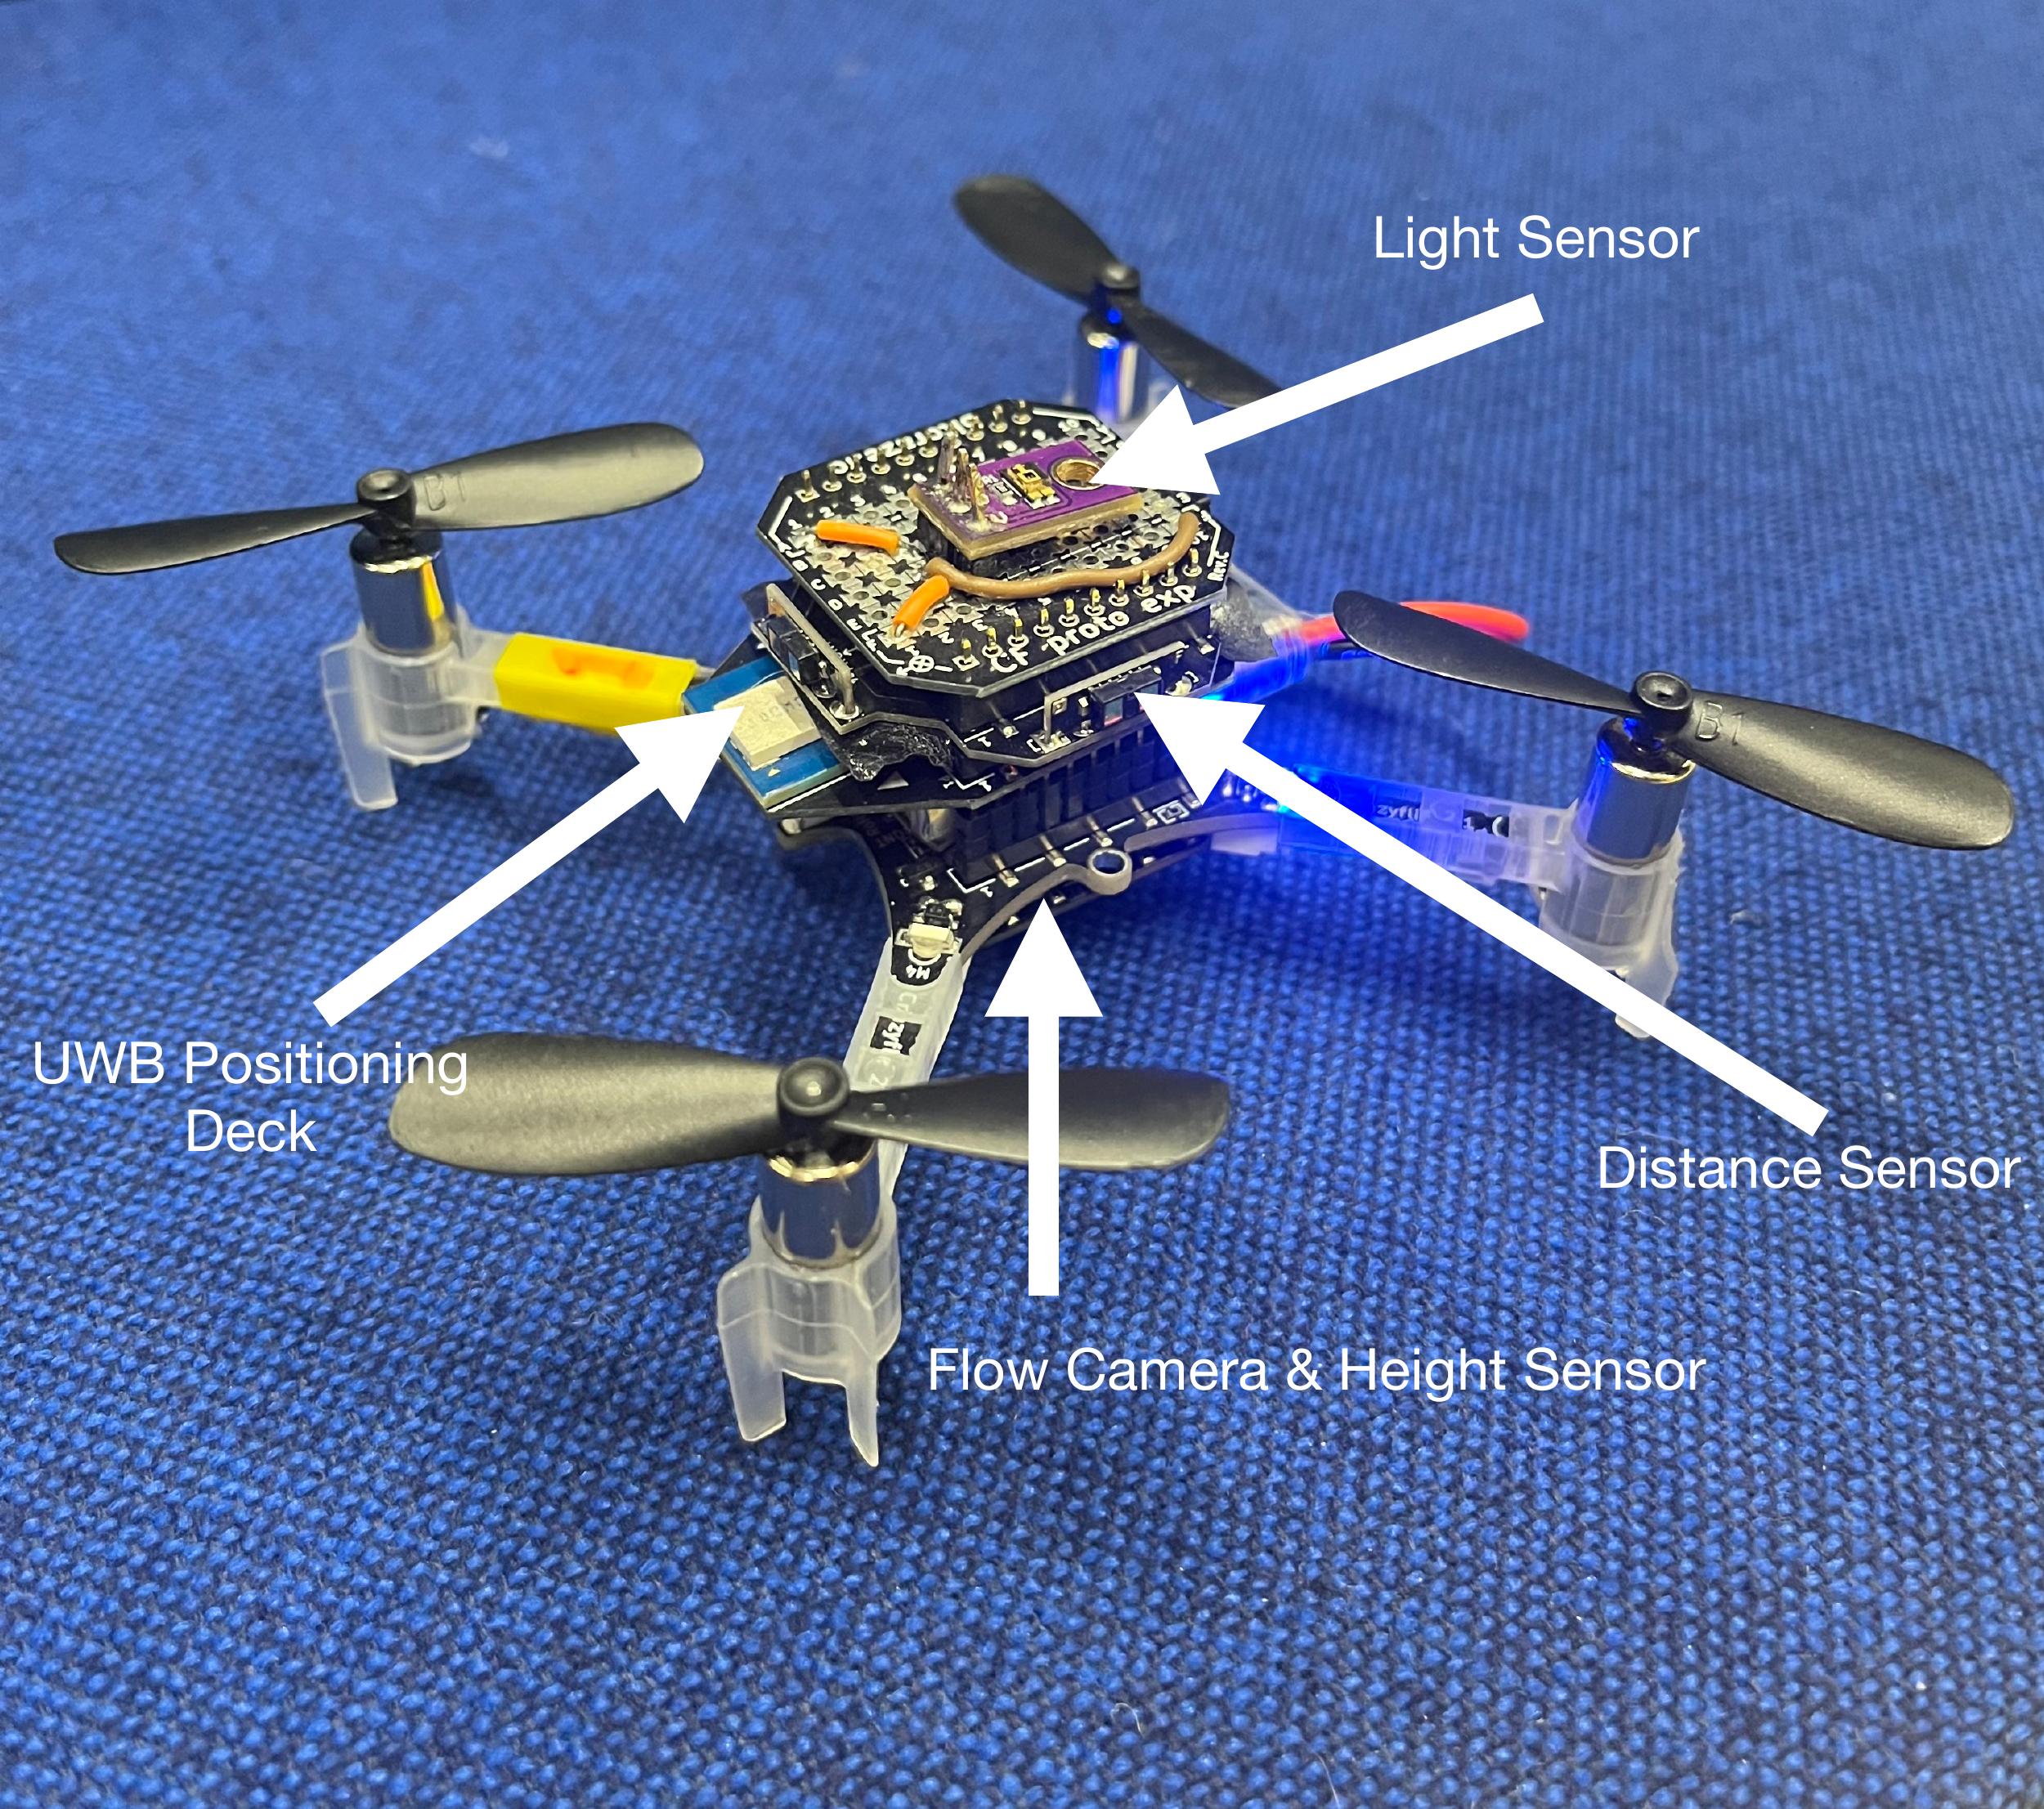
Crazyflie equipped with Flow Deck v2, UWB Deck, Multi-Ranger Deck, and a custom-made deck that produces an analog voltage reading from an LDR for light intensity measurements.
The system architecture allowing us to achieve autonomous flocking and source localization with a swarm of Crazyflie
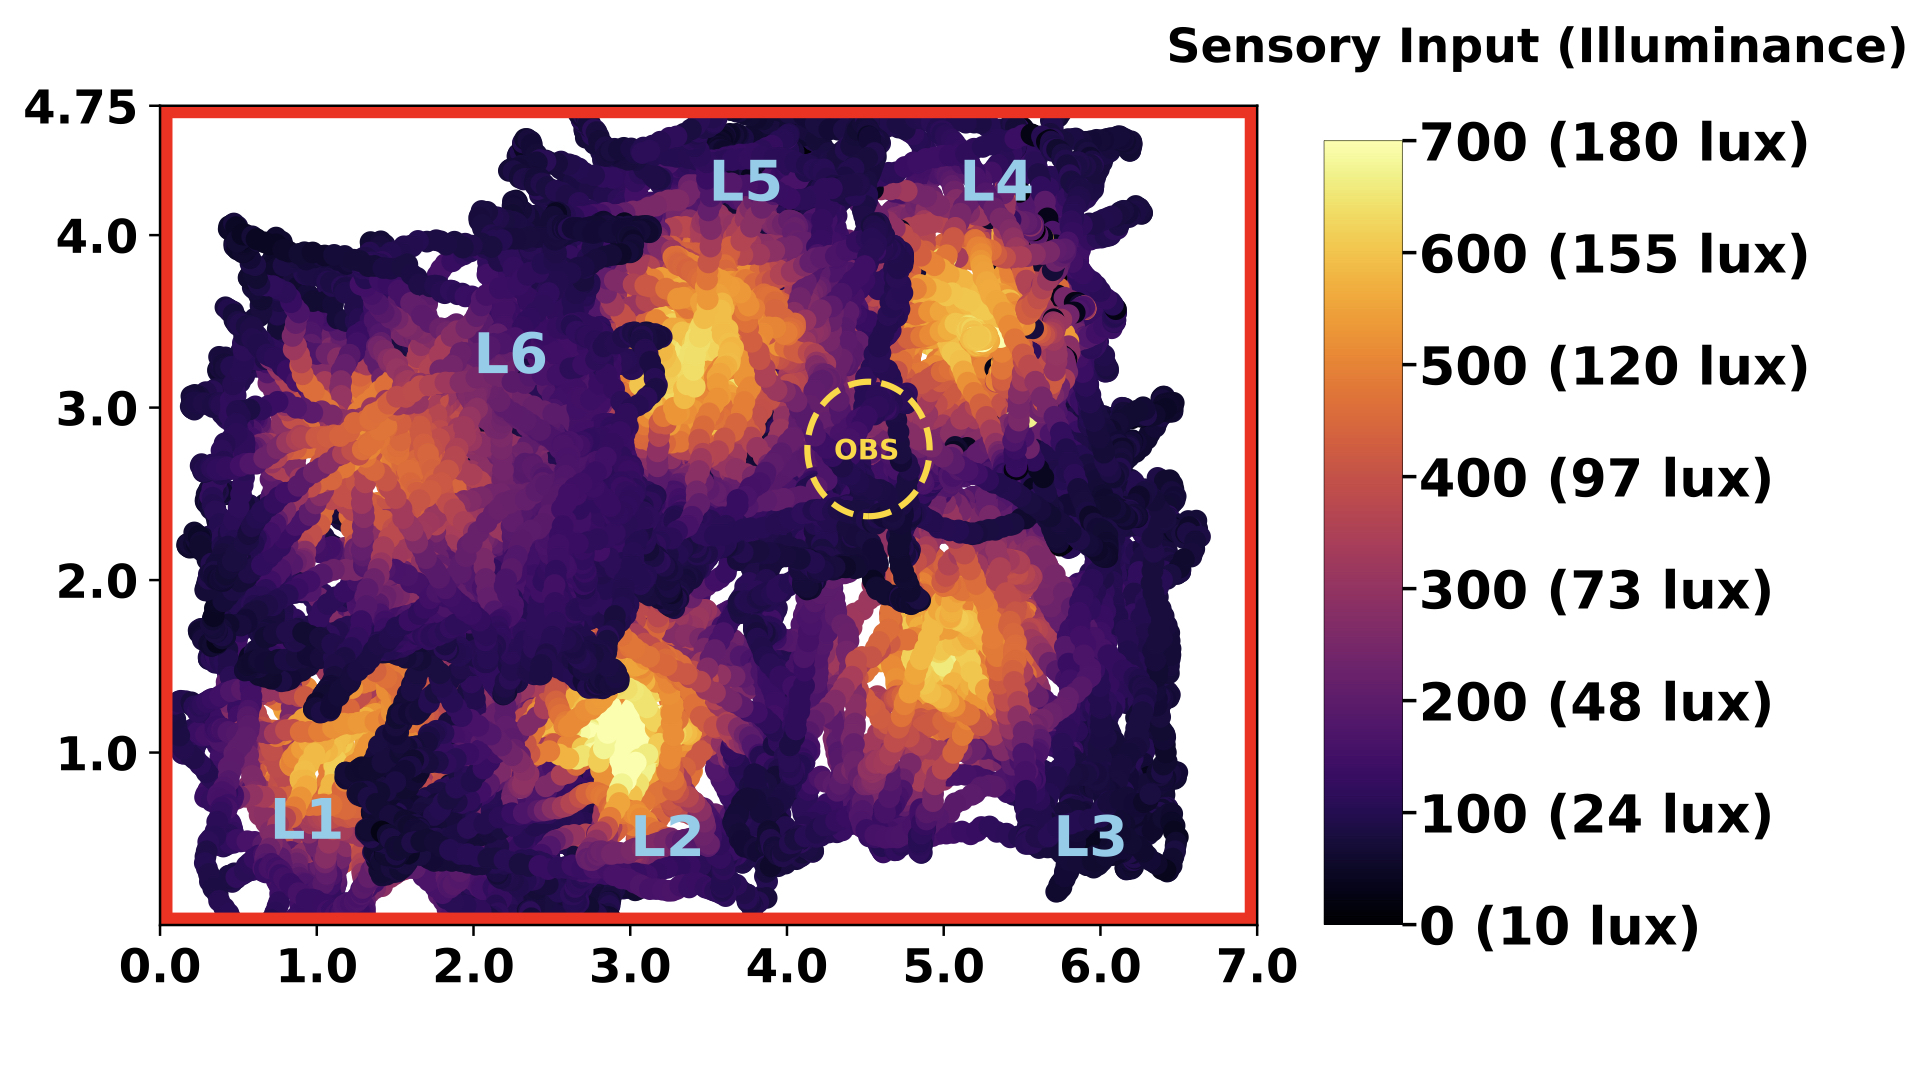
Our experiments take place in a 7×4.75-meter indoor arena with remotely controlled overhead light bulbs. These bulbs, activated individually or in pairs, create a moving light gradient. We tested our flocking swarm by initially positioning them at the edge of an illuminated area. As the light source shifted, we assessed the swarm’s performance by comparing their trajectories with the known centers of the illuminated areas without waiting for full convergence at each step. We also mapped our environment’s light intensity by moving a single Crazyflie randomly around the flight arena and recording the measurements to later merge on a single map to generate this light intensity heatmap.
The brightness values around the test environments, measured for each light source when only it was active.
Results
The flock flies as an ordered swarm, successfully localizing around the source with the swarm’s centroid positioned at the source center. (The centroid appears as a point without an arrow in the video.)
Even with an obstacle present within or between the illuminated regions, the flock successfully localizes around the center, avoiding the obstacle and maintaining order and cohesion within the swarm. The Multi-Ranger deck provides distance measurements for obstacle detection.
Future Directions
As the next step, we plan to apply our highly generalizable algorithm to various source types, including gas sources, radio signals, and similar sources that provide only scalar strength measurements rather than directional cues. Additionally, we have demonstrated that our flocking and source localization algorithms work effectively in 3D. We aim to showcase a fully functional application with a 3D-localized source and a flocking swarm operating in 3D space. Finally, we are working toward achieving fully onboard relative localization, which would eliminate the need for any indoor positioning system. This advancement would allow our swarm to operate autonomously in any environment, replicating the same behavior wherever it is deployed.
The authors were with the Vrije Universiteit Amsterdam.
Please feel free to contact us with any questions or ideas: t.a.karaguzel@vu.nl
Please cite this as:
@ARTICLE{10314746,
author={Karagüzel, Tugay Alperen and Retamal, Victor and Cambier, Nicolas and Ferrante, Eliseo},
journal={IEEE Robotics and Automation Letters},
title={From Shadows to Light: A Swarm Robotics Approach With Onboard Control for Seeking Dynamic Sources in Constrained Environments},
year={2024},
volume={9},
number={1},
pages={127-134},
keywords={Robot sensing systems;Autonomous aerial vehicles;Position measurement;Vehicle dynamics;Sensors;Location awareness;Drones;Swarm robotics;aerial systems: perception and autonomy;multi-robot systems},
doi={10.1109/LRA.2023.3331897}}
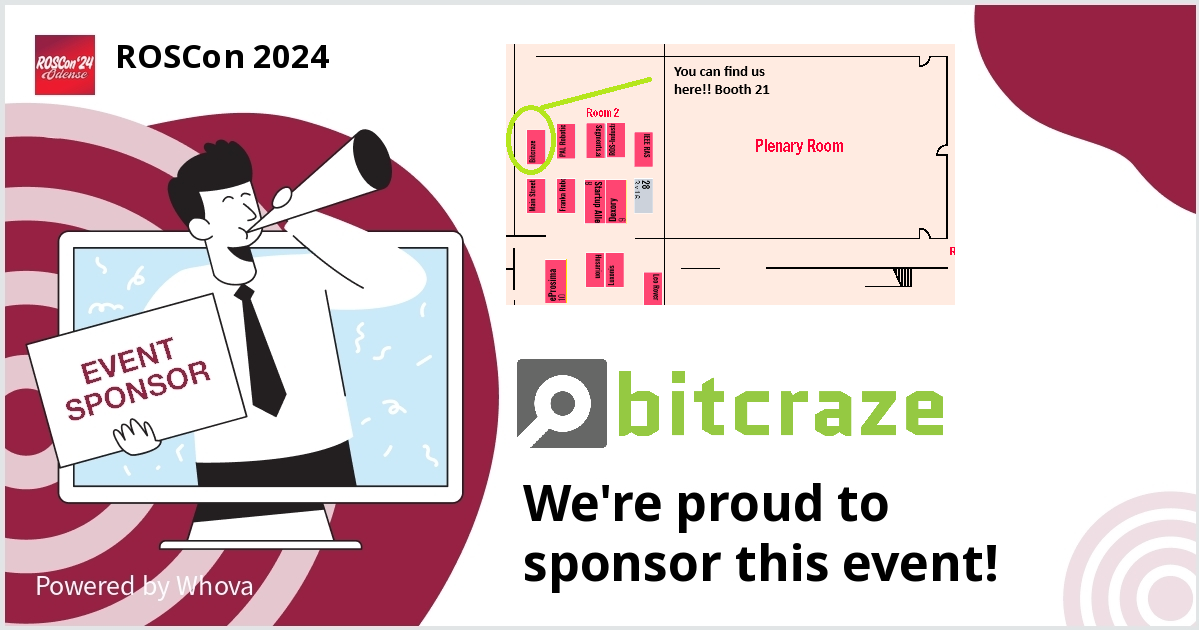
It’s been 2 weeks ago that we went to ROSCon ’24 in Odense Denmark as exhibitor and silver sponsor! Since it was a 2-hour train ride for us, it made much sense for us to attend this as a company and we are very happy we did. In this blog post we are sharing our experiences of the event.
The Booth Build-up and Demo
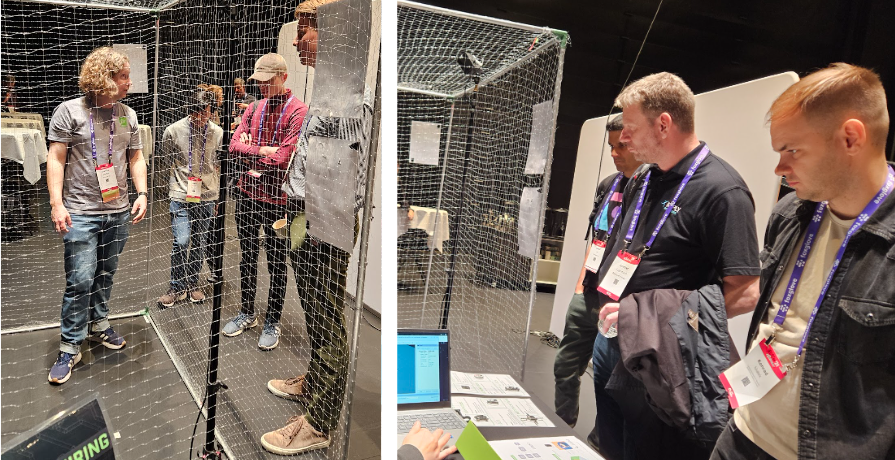
We made some changes to our well-known cage that is a must at every conference we have exhibited. Usually, it would take us a good few hours just to set up the cage alone, but we have improved the corners which improved our build-up experience quite a lot and we were done within an hour! Just in time for us to join the tours and bird of feather sessions with no stress!
All done before 11 am!
For ROSCon we prepared a more ROSflavored demo that enabled full demo control from ROS, which was based on the swarming mapping demo shown in this tutorial and the robotics developer day (see this video). Here we already hit a couple of issues that all had to do with the differences between demos for exhibitions versus one-time talk demos (see OpenCV! Live episode where we talked about demo driven development). We switched back to our usual fully decentralized autonomous swarm demo (see this blog post). Luckily, the Crazyflie could still communicate at the same time to give through the multiranger values, such that the computer could still generate the Swarm merging map while the Crazyflies were flying around avoiding each other.
Exhibition Booth
Tuesday and Wednesday were the actually exhibition days so that is when we talked with most of the people. It was a bit slow in the beginning as we were located at the end of the hall, but luckily the ROSCon passport game motivated people to go by each of the booth to get a stamp. We went a bit rogue and made our own much bigger stamp ;) but luckily it still fit as long as we aligned properly. We donated a STEM Ranging bundle as one of the prizes to congratulate whoever won this! And now they can try out this ROS tutorial ;)
Talking to people outside and inside the cage
We noticed that the Crazyflie Brushless got a lot of attention. The ability to carry more than a regular Crazyflie seemed of great interest to many of the ROSCon attendees. Moreover, the prototype of the forward-facing expansion connector (a.k.a. the Camera deck) was also a well-requested feature of the Crazyflie and has solidified our belief that the community needs something like this as well. In general, the lighthouse positioning system and the stand-alone lighthouse node were also quite well received. Luckily we were able to forward people to our accepted talk about the Lighthouse position system on Thursday
Lighthouse Positioning Talk
One of the reasons we were present at ROSCon 2024 was to gauge the interest of the general robotics community in the lighthouse positioning system. We have been using it for years for the Crazyflies, but we’d like to also evangelize its submillimeter and cost-effective awesomeness for any other platform. And there seems to be quite some interest for it! We gave a short presentation on Thursday Afternoon during the ‘ROS Tooling & Testing’ session (we will share the recording once it becomes available).
Talk about Lighthouse Positioning – Taken by Dharini Dutia from Women in Robotics
We also send out some polls just to see what kind of positioning systems are used and for what purpose. It was evident that there are many outdoor roboticists that also use onboard-sensing based state-estimation like SLAM, but there was still a significant portion of people that used indoor positioning systems for the actual positioning replacement and/or Ground truth. And also we got some valuable feedback, like if it would still work out with a Lidar or Kinect, or if it is suitable for a 12-meter size robot (wow). We will take this all in for improvements for any new upgrades to the lighthouse deck and stand-alone nodes for it. Thanks to you all for providing all the feedback and the interest!
Side-events
We also attended a couple of events related to ROSCon 2024. Marcus and Kimberly both attended tours of Odense Robotics, Universal robots and Teradyne facilities. The tour of the SDU Drone Center was particularly impressive. Moreover, we also attended the Aerial Robotics Meetup, who attracted about 90-100 people at the max, with drinks and snacks provided by Dronecode Foundation. It was great to see such a big aerial presence at ROSCon. There was also the Karaoke meetup, the ROSCon afterparty by Odense Robotics with a beer-serving robot arm, the Women in Robotics lunch… there was just too much to attend to but it all was a great success!
Check out the ROSCon 2024 event page on our website of what we have shown at ROSCon 2024 and see more information about the demos/products we had there.
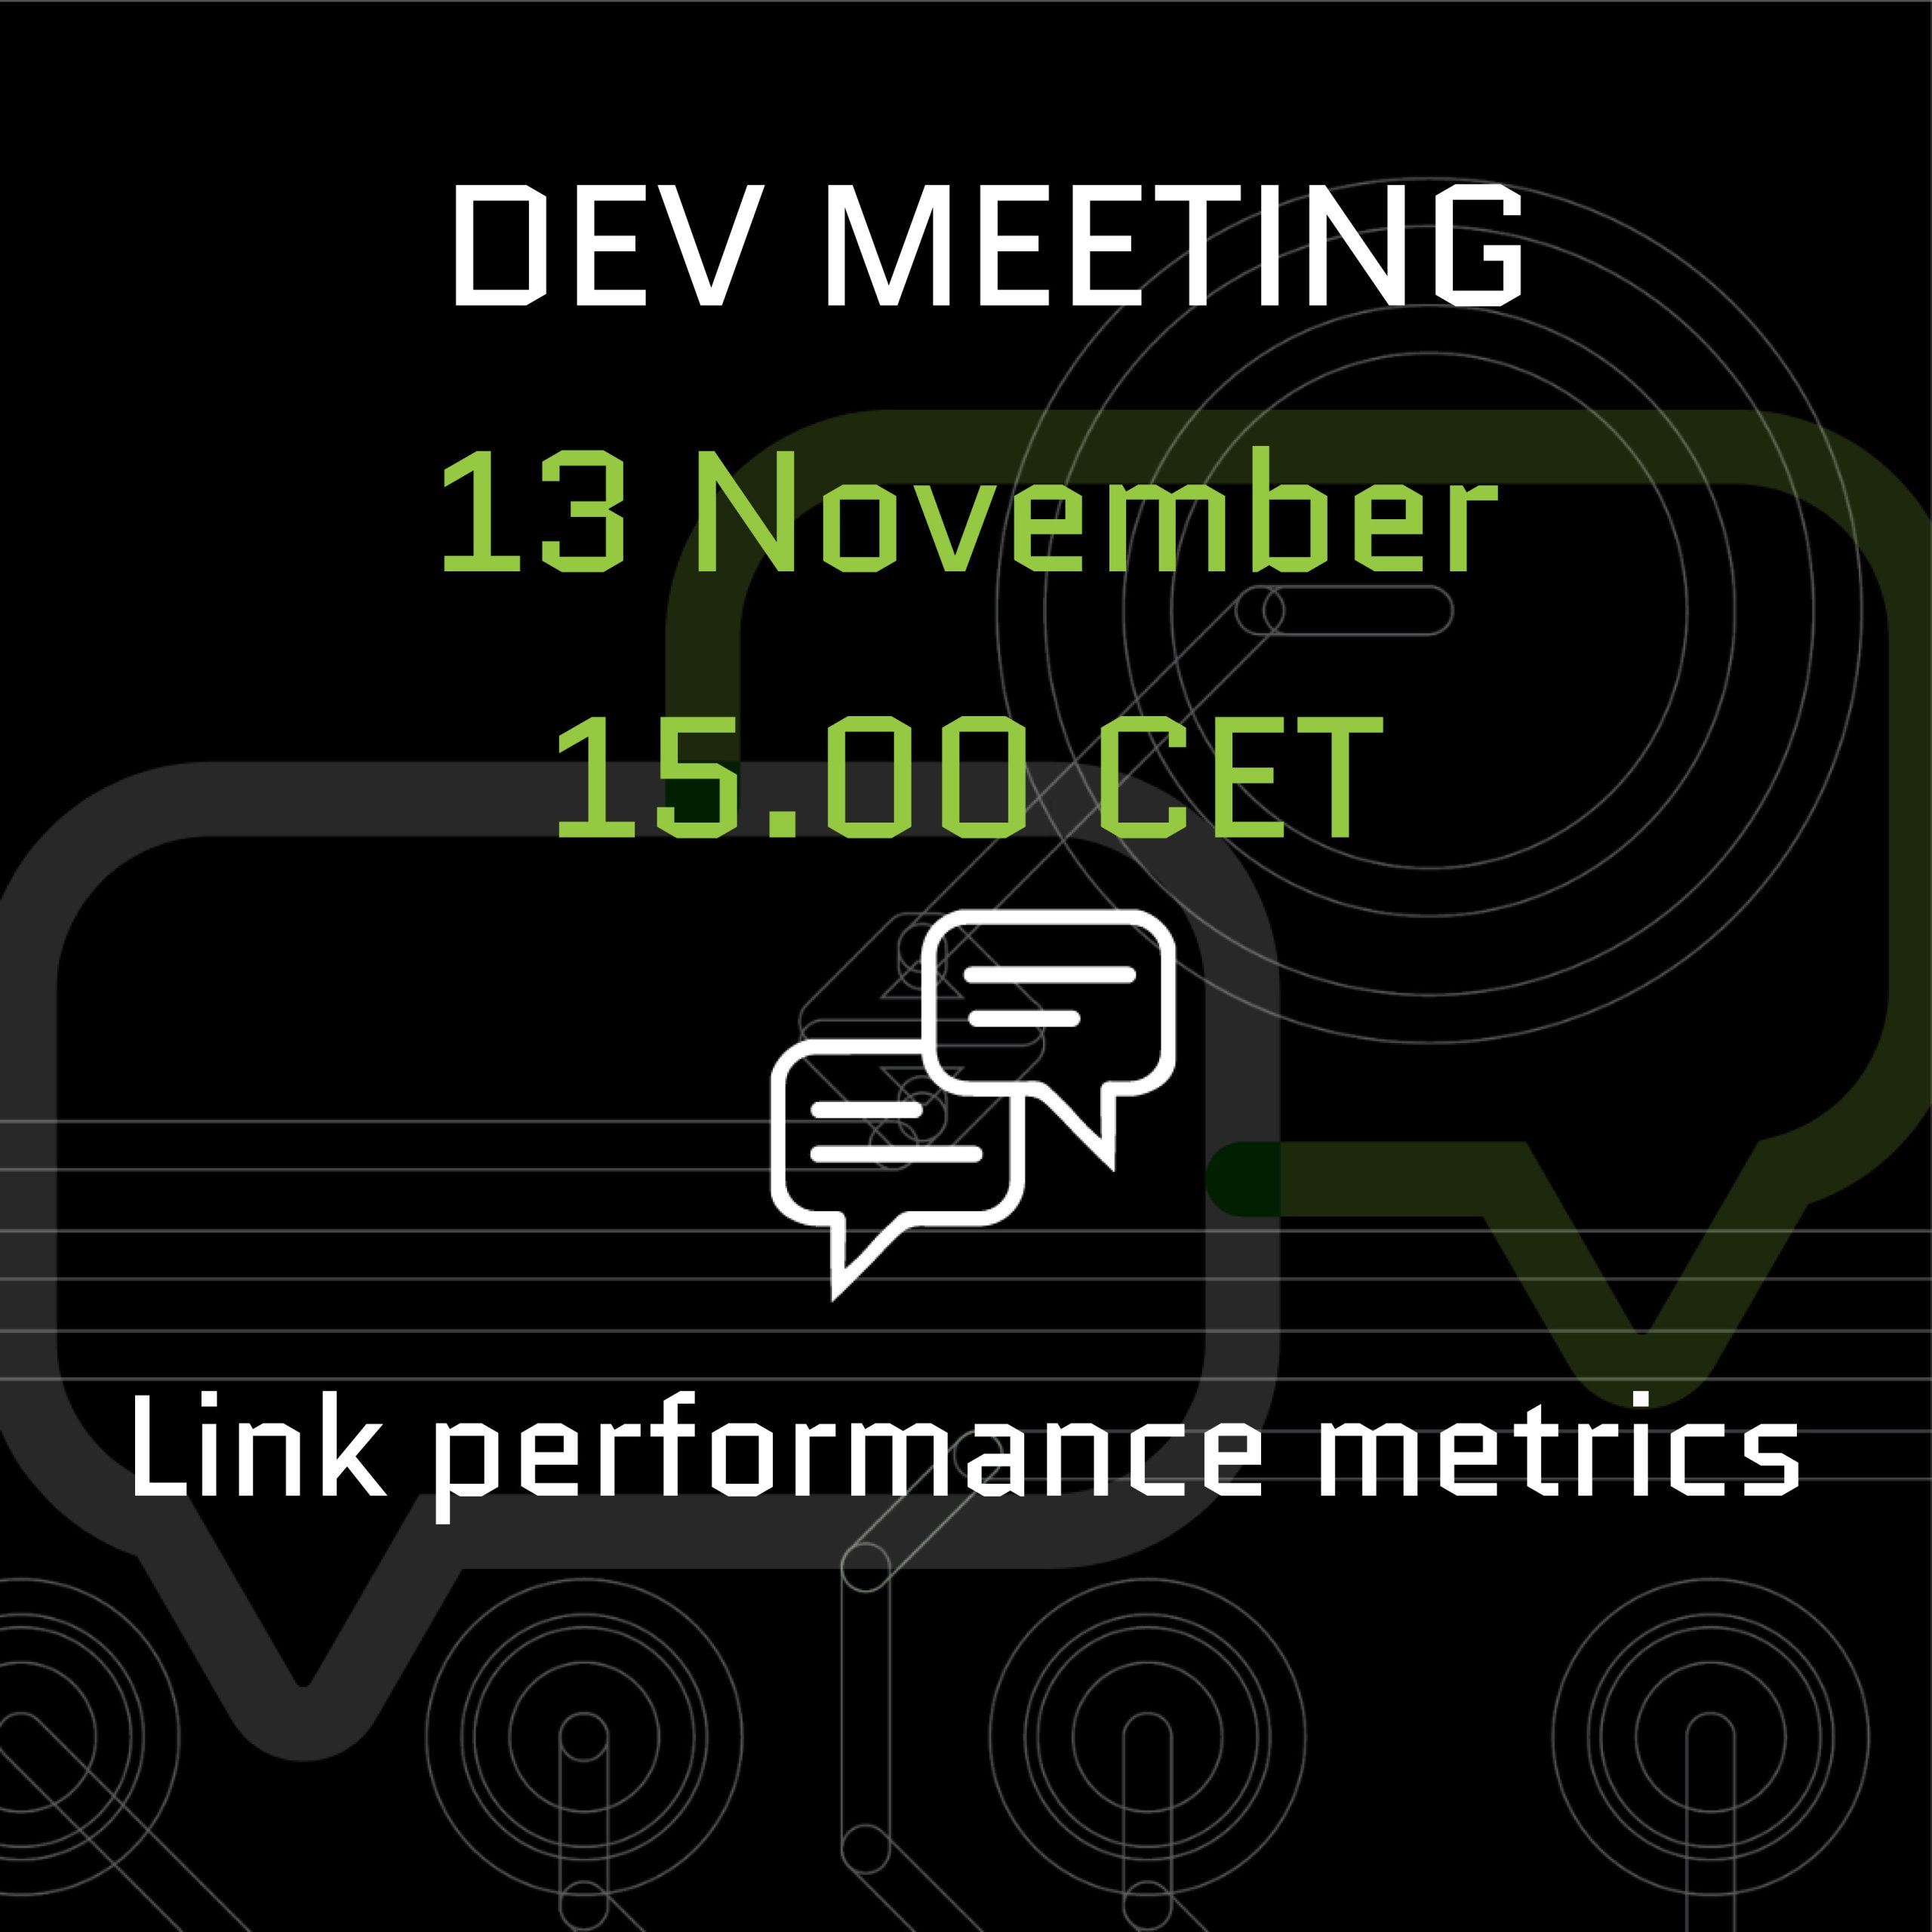
We are excited to announce that we are working on several new link performance metrics for the Crazyflie that will simplify the troubleshooting of communication issues. Until now, users have had access to very limited information about communication links, relying primarily on a “link quality” statistic based on packet retries (when we have to re-send data) and an RSSI channel scan. Our nightly tests have been limited to basic bandwidth and latency testing. With this update, we aim to expose richer data that not only enables users to make more informed decisions regarding communication links but also enhances the effectiveness of our nightly testing process. In this blog post, we will explore the new metrics, the rationale behind their introduction, and how they will improve your interaction with the Crazyflie. Additionally, we will be holding a developer meeting on Wednesday November 13th to discuss these updates in more detail, and we encourage you to join us!
“Link Quality”—All or Nothing
Until now, users of the Crazyflie have had access to a single link quality metric. Implemented in the Python library, this metric is based on packet retries—instances when data packets need to be re-sent due to communication issues. This metric indicates that for every retry, the link quality drops by 10%, with a maximum of 3 retries allowed. As a result, the link quality score usually ranges from 70% to 100%, with a drop to 0% when communication is completely lost. However, as packet loss occurs, users often experience a steep decline, commonly seeing 100% when packets are successfully acknowledged or dropping to 0% when communication is completely lost.
Client representation of link quality; no link, yes link
The current link quality metric has served as a basic indicator but provides limited insight, often making it difficult to gauge communication reliability accurately. Recognizing these limitations, we’re introducing several new link performance metrics to the Crazyflie Python library, designed to provide a far more detailed and actionable view of communication performance.
What’s Coming in the Upcoming Update
The first metric we are adding is latency. We measure the full link latency, capturing the round-trip time through the library, to the Crazyflie, and back. This latency measurement is link-independent, meaning it applies to both radio and USB connections. The latency metric exposed to users will reflect the 95th percentile—a commonly used measure for capturing typical latency under normal conditions.
Next are several metrics that (currently) only support the radio link. For these, we distinguish between uplink (from the radio to the Crazyflie) and downlink (from the Crazyflie to the radio).
The first is packet rate, which simply measures the number of packets sent and received per second.
More interestingly, we are introducing a link congestion metric. Whenever there is no data to send, both the radio and the Crazyflie send “null” packets. By calculating the ratio of null packets to the total packets sent or received, we can estimate congestion. This is particularly useful for users who rely heavily on logging parameters or, for example, stream mocap positioning data to the Crazyflie.
The Received Signal Strength Indicator (RSSI) measures the quality of signal reception. Unlike our current “link quality” metric, we hope that a poor RSSI will serve as an early warning signal for potential communication loss. While RSSI tracking has been possible before with the channel scan example, this update will monitor RSSI in the library by default, and expose it to the user. The nRF firmware will also be updated to report RSSI by default. Currently, we only receive uplink RSSI, that is, RSSI measured on the Crazyflie side.
Work in progress client representation of new link performance metrics
We’ve already found these new metrics invaluable at Bitcraze. While we have, of course, measured various parameters throughout development, it was easy to lose track of the precise status of the communication stack. In the past, we relied more on general impressions of performance, but with these new metrics, we’ve gained a clearer picture. They’ve already shed light on areas like swarm latency, helping us fine-tune and understand performance far better than before.
You can follow progress on GitHub, and we invite you to try out these metrics for yourself. If there’s anything you feel is missing, or if you have feedback on what would make these tools even more helpful, we’d love to hear from you. Hit us up over on GitHub or join the developer meeting on Wednesday the 13th of November (see the join information on discussions).
We are happy to announce that release 2024.10 is now available! Special thanks to our community contributors for their valuable input and code contributions in this release!
We have some very busy weeks behind us and ahead! As we are working hard on releasing the new CF Brushless, we have been preparing for the upcoming ROSCon in Odense Denmark next week (see this previous blogpost) and we also featured on the latest OpenCV live episode as well! So more about both in this blogpost.
OpenCV Live! Demo Driven Development
We were featured as guests on the latest OpenCV Live! episode hosted by Phil Nelson and Satya Mallick, where we went through a bit of the history of the start of Bitcraze and all of the (crazy) demos done with the Crazyflie in the last decade. We have done a similar topic for our latest developer meeting, but for this episode we put the focus more on vision based demos, since OpenCV has been definitely used in the past at Bitcraze for various reasons! Just type in OpenCV in the top right search barto check out any of the blogs we have written.
During the OpenCV live episode of the 10th of October, Arnaud and Kimberly told the backstories of these demos that went from a manual flight fail where Arnaud flew the Crazyflie 1.0 in Marcus’ hair, using OpenCV and Aruco markers for positioning to flying a swarm in your kitchen. It was really fun to do and alos one lucky listener managed to answer the two questions the host Phil asked at the end, namely “Where does the name Crazyflie come from?” and “Why is the last part (‘-flie’) spelled this way?” and won a STEM ranging bundle. If you’d like to know the answers, go and watch the latest OpenCV! Live episode ;) Enjoy!
ROSCon – What to expect?
So next week we will be present as Silver Sponsor at ROSCon Odense, namely on Monday 21th and Wednesday 23rd of October. The Bitcraze booth will be located on number 21 so that should be near the coffee break place! We will have are old trusty cage with some upgrades with a nice ROS demo which is similar to the one explained in this Crazyflie ROS tutorial we have written a while ago, but then the swarming variant of it. We also hope to show a Brushless Crazyflie Prototype, and a new camera deck prototype, along with anything else we can find lying around at our office :D.
Moreover, Arnaud will be given a presentation on the lighthouse positioning system, namely at Wednesday 23rd of October 14:40 (2:30 pm) called ‘The Lighthouse project: from Virtual Reality to Onboard Positioning for Robotics’. The lighthouse positioning system will also be the system that we will demo at our booth so if you’d like to see it for yourself, or perhaps (during downtime) hack around together with us, you are more than welcome to do so! Check out the Bitcraze ROSCon Eventpage for more details about our demo or the hardware we will show.
It’s now become a tradition to create a video compilation showcasing the most visually stunning research projects that feature the Crazyflie. Since our last update, so many incredible things have happened that we felt it was high time to share a fresh collection.
As always, the toughest part of creating these videos is selecting which projects to highlight. There are so many fantastic Crazyflie videos out there that if we included them all, the final compilation would last for hours! If you’re interested, you can find a more extensive list of our products used in research here.
The video covers 2023 and 2024 so far. We were once again amazed by the incredible things the community has accomplished with the Crazyflie. In the selection, you can see the broad range of research subjects the Crazyflie can be a part of. It has been used in mapping, or swarms – even in heterogeneous swarms! With its small size, it has also been picked for human-robot interaction projects (including our very own Joseph La Delfa showcasing his work). And it’s even been turned into a hopping quadcopter!
Here is a list of all the research that has been included in the video:
Energy efficient perching and takeoff of a miniature rotorcraft Yi-Hsuan Hsiao, Songnan Bai, Yongsen Zhou, Huaiyuan Jia, Runze Ding, Yufeng Chen, Zuankai Wang, Pakpong Chirarattananon City University of Hong Kong, Massachusetts Institute of Technology, The Hong Kong Polytechnic University
But enough talking, the best way to show you everything is to actually watch the video:
A huge thank you to all the researchers we reached out to and who agreed to showcase their work! We’re especially grateful for the incredible footage you shared with us—some of it was new to us, and it truly adds to the richness of the compilation. Your contributions help highlight the fantastic innovations happening within the Crazyflie community. Let’s hope the next compilation also shows projects with the Brushless!
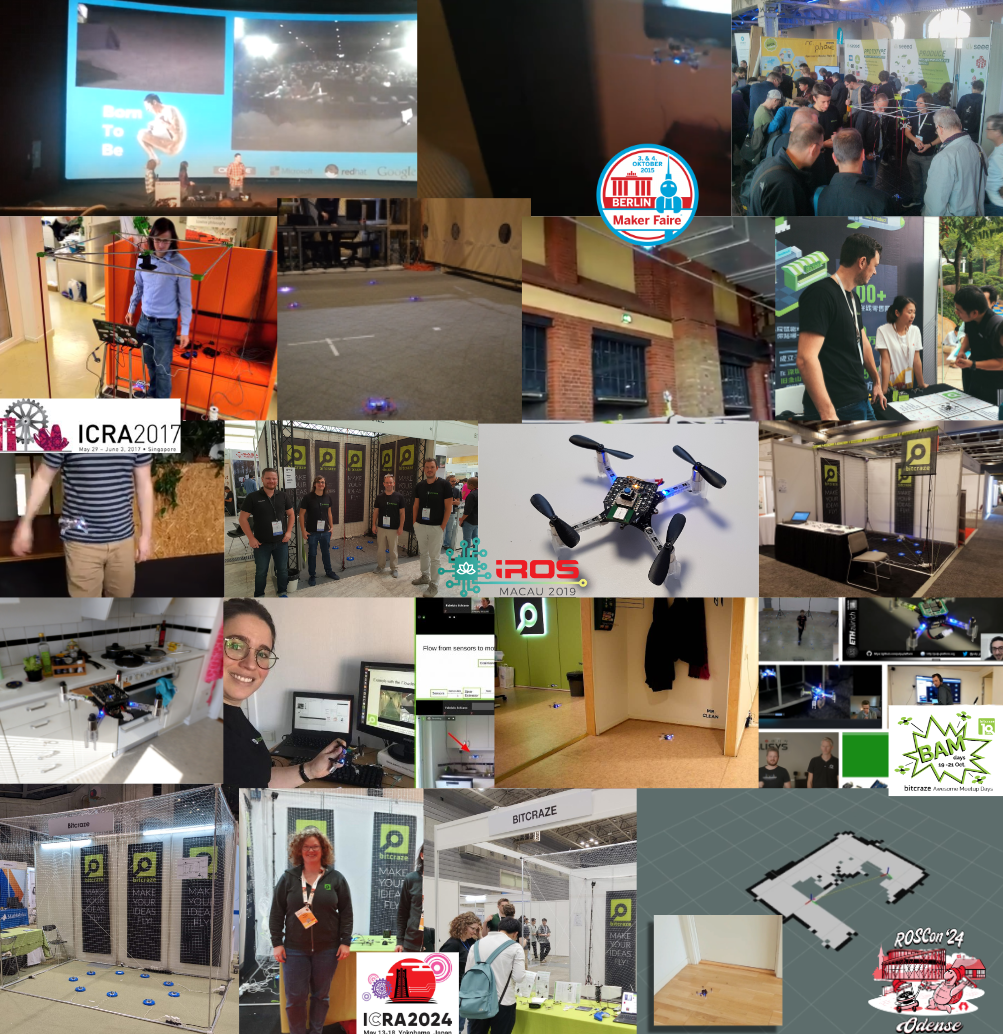
There is one thing that has driven both the hardware/software and our enthusiasm forward in the last 13 years, and that is making demos! Whether it’s a new piece of hardware/deck for the Crazyflie or the integration with an existing software framework, it doesn’t matter, but we have got to show it and, by all means… it needs to fly!
We have used fairs, conferences, and online meetings as perfect opportunities to push the capabilities of the little Crazyflie to the fullest. Of all the development goals we set, those self-made deadlines and over-ambitiousness have pushed both the hardware and software to the limit. In this blog post, we will take a look back at all of those demos we’ve done in the past and what we have learned from them.
2013 – 2017: Hacker and Developer Fairs
One of the very first conferences we were invited to was Devoxx in the UK. This was back in 2013, and we flew the Crazyflie (1) with an FPV camera over the actual crowd (blogpost, video), which was something we had already been working on for about half a year before showing it at the conference (blogpost, video). A year later, at Devoxx France (2014), they let us fly at the actual exhibition and over the booths, which showed much better quality (blogpost, video)! Not sure if they would still let us do this at fairs, but back then it was a bit of a wild west :D.
By the time the Crazyflie 2.0 was released, we started going to Makerfaires and even visited 3 of them, all in 2015! At the Makerfaire in the Bay Area (blogpost), New York, and Berlin (blogpost 1, blogpost 2), we prepared an external positioning system with the Kinect 2 and augmented reality markers (ArUco) (blogpost). That was one hectic year, and not without issues with the demo itself along the way (blogpost), but it showcased the Crazyflie and pushed the Crazyflie Python library and client to a more mature state.
Once 2016 came, the ultra-wideband positioning hacks reached a point where we could start demoing them as well. At first, the positioning was still calculated offboard with a ROS(1) node and transmitted to the Crazyflie, which was first showcased at Makerfaire Berlin 2016 (blogpost, video) at the booth itself. Eventually, a live demo was given at FOSDEM 2017 in the actual devroom for Embedded, Mobile, and Automotive (talk page). The Flowdeck was also in development at that time, and we had a small tabletop demo at Makerfaire Shenzhen 2017, where people could press a button, and the Crazyflie would take off, fly a circle, and land again (blogpost, video).
2017 – 2019: Academic Robotics Conferences
From 2017, we made it a habit to also meet with our research users, so we started going to academic robotics conferences as well, starting with ICRA 2017 in Singapore. Here, we showcased the Loco Positioning System, where the positioning was estimated onboard, so no external computer was required to perform the calculations (blogpost, video).
At IROS 2018, we took it up a notch by joining our collaborator Qualisys, showcasing the Loco Positioning System for a swarm, Motion Capture-based localization, and the brand new Lighthouse positioning prototype (blogpost 1, blogpost 2). We also added autonomous charging to it as well, so it was a great deal of work! Maybe we took on a bit too much, but one thing is for sure—we learned a lot by doing it (blogpost 1, blogpost 2, video)! With ICRA and IROS 2019, we perfected the circling swarm demo so that it was fully autonomous. However, this time we only used the Lighthouse positioning system since it was a bit easier to set up (blogpost 1, blogpost 2, video). The computer still had to command which Crazyflie to start flying, but other than that, we didn’t have to mind it that much and had plenty of time to talk with the users.
2020 – 2022: Covid and the Home Lab
As everyone knows—and probably tries to forget—2020 was the year that Covid hit us hard, and we couldn’t travel anywhere anymore. For us, it was quite an adjustment period, as we had to find another type of motivation to keep moving forward and continue development. We introduced the concept of the home lab and gave online talks and tutorials to still show cool stuff with the Crazyflie to the world (blogpost, video).
In 2020, we all joined together to work on the Hyper demo, which was a showcase that demonstrated the Crazyflie could fly with three positioning systems at the same time, enabling it to fly all the way from the meeting room to the flight arena (blogpost, video). We also celebrated Bitcraze’s 10-year anniversary with the BAM Days, a full 3-day online seminar about all things Crazyflie, for which we and our collaborators prepared a whole range of different demos, including a Rust-based app layer example and a peer-to-peer onboard swarming example (blogpost).
2022-now: Back to conferences
At the end of 2022, we managed to go to fairs again, namely IMAV and IROS 2022, where we showcased the fully autonomous swarm demo as before Covid hit. However, due to the demos we conducted during Covid, we also added full onboard peer-to-peer communication. This enabled the Crazyflies to negotiate which Crazyflie could take off, which pretty much completely eliminated the need for an external computer. Moreover, the Crazyflies communicated their positions to each other, which made it possible for them to avoid collisions on the fly (blogpost, video).
We have shown this demo as well for ICRA 2023 in London (blogpost) and ICRA 2024 in Yokohama (blogpost) with different variations and the upcoming brushless version as well (blogpost). The demo is quite robust, but it’s great to learn about the quality of the new motors and props, the guard prototypes of the Crazyflie Brushless, and the flight stability. But as you know us by now, it is time for something different!
Soon – ROSCon 2024
We have been to ROSCon before, back in 2022 (blogpost), but now we will be going to ROSCon 2024 for the first time as exhibitors (blogpost). ROS is a framework that is used by many researchers, including our users through Crazyswarm2, but ROSCon is more developer-oriented, and there will be more companies present that focus more on industry than academia. This time we won’t show our swarm demo as we usually do, but we will be showing demos more in line with what is presented in the ROS skill learning session of the robotics developer day (blogpost, video), but we will be hacking around on the spot! So this will be something new for us to try out, and we are very much looking forward to it!
Developer meeting, 9th of October 2024
This blog post only represents a subset of demos that we have done, but we will go into further detail at the next developer meeting on Wednesday, the 9th of October, at 3 PM CEST! Please join us to learn about all the great demos we have done in the past, get a glimpse of the history of Bitcraze, and discuss why demo-driven development is so important in moving your development forward.
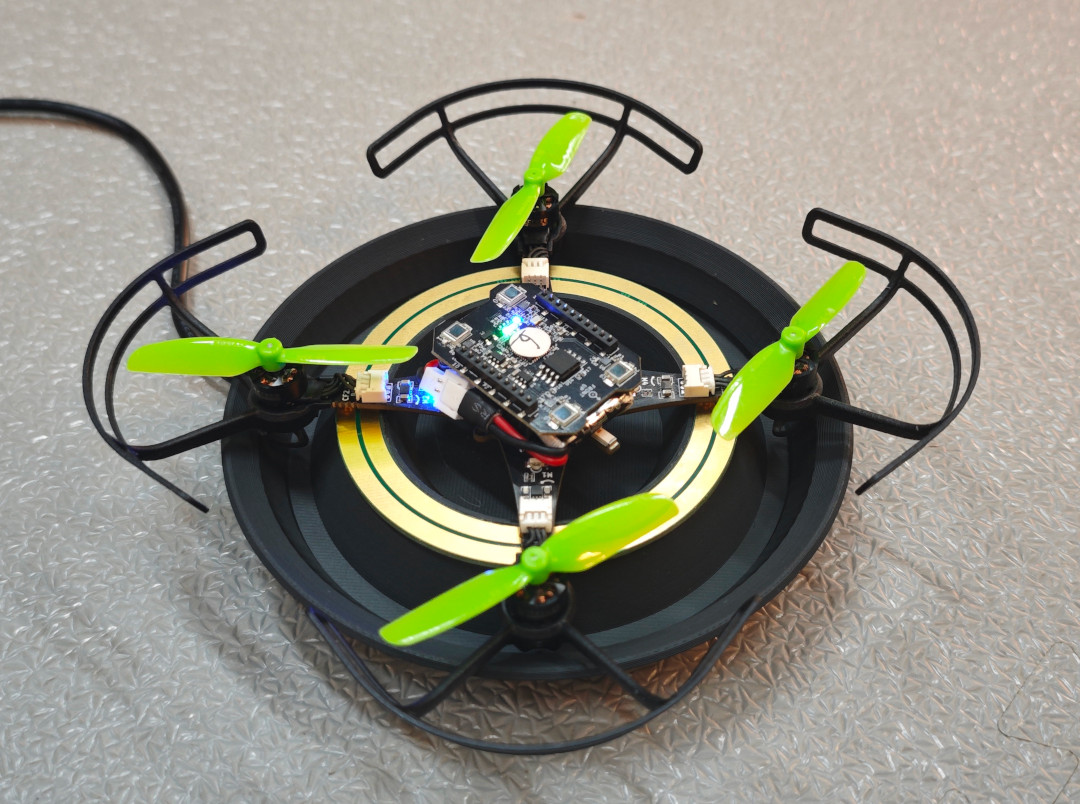
Ever since we started going to fairs to show off the Crazyflies, we’ve been trying to push the boundaries for the demos. Often we’ve used the fairs as an opportunity to either develop new functionality or try out new ideas. Something we’ve always been interested in, especially for fairs, is autonomous flights. It’s hard to talk to people about the Crazyflie while trying to fly it at the same time. Back in 2015 we were using the Kinect for piloting the Crazyflie at the Bay Area Maker Faire. Although awesome, we had a slight issue: we needed to switch batteries on the Crazyflie each flight. We had a Qi deck for wireless charging but no positioning system good enough to use it for landing on a charger.
Latest iteration of the Crazyflie Brushless charger
In 2018 we were really excited when we got to borrow a motion capture system from Qualisys and could finally land on a Qi charger (3D printed base and an IKEA Qi charger). First time we showed this off was at IROS in Madrid 2018. The following year we improved the demo to have more Crazyflies and switched to the Lighthouse positioning system at ICRA 2019. Since then each year we have been improving the demo until we’ve reached the current state we showed off at IROS 2022 in Kyoto.
So since 2018 we’ve been using the Qi wireless charging for our demos. Many customers have purchased the Qi charging deck, but building a matching charging platform has always required some effort. So, a while back we started looking at something that could replace the Qi deck, with a lighter solution which would also allow users to have other decks with electronics facing downwards. The first prototypes were made with the Crazyflie 2.1 back in 2021 using decks, but they were a bit clumsy. For one thing you needed the charging solution to be integrated on each deck.
When work started on the Crazyflie Brushless we realized we had the possibility to integrate the charge points directly on the main PCB which meant we could still use any decks we wanted and get the charging. So the prototypes from 2021 were reshaped into something we could use with the Crazyflie Brushless. Although the prototypes worked well, they were pretty big and packed with features which weren’t needed for charging (like LED lights and WiFi). Another iteration and the chargers have now gone down in size and complexity. The latest iteration only has charging and is powered via our 12V power block or 5V USB-C.
Over the years lots of customers have asked us for buying the Qi charger, since many users do not have the capabilities to build their own. Unfortunately we’ve never gotten around to it, but with the release of the Crazyflie Brushless we would like to change this. The release is only a few months away so we’re short on time for remaking the design so it’s usable for plastic molding. Instead the plan is to make a limited amount of prototypes available to our users, based on the same 3D printed design and electronics we’re currently using in our flight lab, at the time of release. This will enable our users to easily try out the design and create their own autonomous demos which will keep flying for a long time.