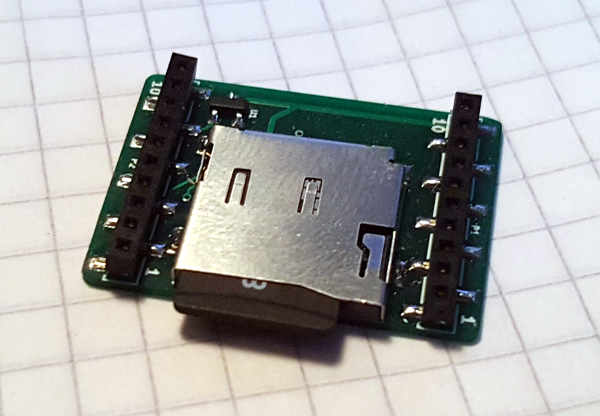
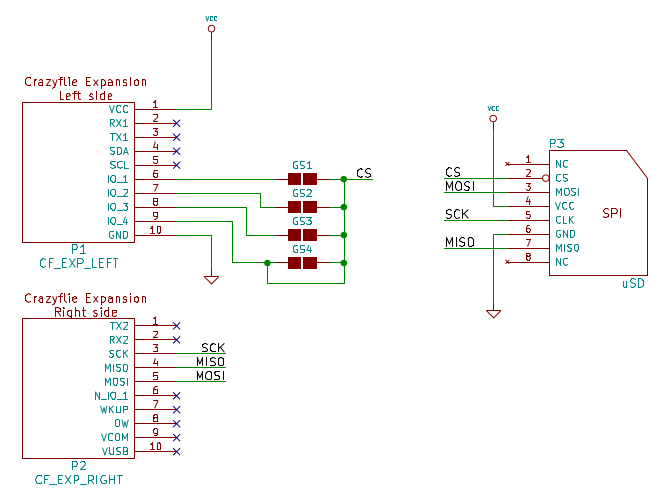
Category: Crazyflie

Last week and this week is busy with preparations for the New York and Berlin maker faires. Since we will be in the Seeedstudio booth we don’t have the same space as at the Bay Area Maker Faire, so we had to rebuild our “fly-cage”. The new specs are 1.7 x 0.7 x 0.7 meters. This is the area the Crazyflie 2.0 should be able to fly in for a full charge without touching the sides on the net.

We don’t have any special plans during the faire, except for flying during the day. So if you feel like meeting up, having a beer and getting lost in various technology discussions then leave a comment or drop us a mail.

The autonomous flying rig we used in bay-area was using the Kinect 2 sensor. This new rig is only using a standard webcam which is cheaper and easier to manage (ie. we do not need a Windows computer anymore). We are attaching an augmented reality marker on the top of Crazyflie and the image processing is mostly done by the ArUco library. ArUco is detecting the position of the Marker in 3D and the position is sent via zeromq to the controller. We used the same controller code as for the Kinect, we just had to tune it a bit better to keep in the smaller space. Then the controller is sending pitch/roll/yaw to the Crazyflie client setup to have a ZMQ as input device.

CPBrmPrUAAAKkEj

If you want to build the same cage then here’s a list of the parts:

  • Some kind of net (we used normal fishing net)
  • Fishing line (to tighten the cage)
  • Aluminium beam (for tents)
  • These 3D printed parts
  • Webcam with standard camera attachment (we use Logitech C920)
  • Camera attachment screw

We are in the process of cleaning up the code for the webcam. It will be pushed on Github and we will document the build on the Wiki.

We have decided to use Travis for continuous integration builds of our open source repositories. Travis is automatically building the code on all branches and pull requests, which gives all developers that wants to contribute to the project, the possibility to see that their code passes the build. The current status of the latest build on the main branch, is visible through the icon in the readme in github, or on the Bitcraze page at travis.

travis-ci

The projects we have added so far to travis are written in C or python. The C projects for instance, must be compiled with special compilers for the processors used in the crazyflie which adds some extra complexity. We have created a docker image (bitcraze/builder) with the tools needed, to make life easier for developers. If you use the image when developing, there is no need to install tools locally, and the same image is used in travis builds, so you know you will get the same results as the CI-server. This also removes the problem of tools with different versions (and results) in the development- and build environment.

To use the image you can for instance type

docker run --rm -v ${PWD}:/module bitcraze/builder make

Event though it is awesome to be able to create a well known build environment through a docker container, we feel that too much typing is needed to execute a simple make.  To solve that problem we are looking at the possibility of creating a toolbelt that will handle that for you. More information on that later on, for now developers will have to find their own solutions through scripting, aliasing or other means.

Obviously you need Docker to use this image. If you have not tried it out yet, take a look at www.docker.com.

We are aiming for automated testing of our code, and even though we have a lot of work to do, we have taken the first baby step. For the moment, firmware projects are simply compiled and linked to ensure that the code is coherent. Projects that support both crazyflie 1 and 2 are built in both flavours to avoid problems for developers that might only use one of the platforms.  The python client project is only checked for PEP8 compliance, but we are looking at how to unit test. Any input from the community is welcome!

Happy hacking!

During the last week we’ve taken a big step, moving to Python 3! The reason for the move is that Python 3 is becoming broadly adopted and it has more features that we want to make use of. Also 3 > 2. This post will explain a bit of what we did, some of the problems we encounters and the current status. The numbers 2 and 3 will be thrown around a lot in the text, but to precise we’re talking about versions 2.7+ and 3.4+ (even more precise it’s been tested on 2.7.9 and 3.4.3). The next release of the client will run on Python 3, but if you want to test it now just clone the development branch on GitHub.

Status

If you have developed applications using the API and Python 2 then you might be getting a bit worried right about now. The compatibility for both Python 2 and 3 will be kept for most things, except for the client:

This will be compatible with both 2 and 3:

  • The Crazyflie Python API (everything in lib/cflib)
  • The examples for the Crazyflie Python API (everything in examples)
  • The ZMQ server using the Crazyflie Python API (bin/cfzmq)
  • The Crazyflie command-line bootloader (bin/cfloader)

But the main clients will only have Python 3 compatibility:

  • The Crazyflie Python client (bin/cfclient)
  • The Crazyflie Python headless client (bin/cfheadless)

API Examples

While doing the porting we’ve also added more examples to cover more of the Crazyflie Python API. In order to keep 2/3 compatibility for the API it’s important to be able to test it easily with the different versions. We are having unit-tests on the TODO-list, but until then we’ve been using the API examples to test. All the examples should run with both Python 2 and 3. It’s also a good thing with more examples showing how to use the API…

Porting and compatibility

The approach we used was to first run the 2to3 utility to automatically to as much as possible of the porting. After that we had to fix the rest of the errors manually and also maintain the dual 2/3 compatibility of the API.

In our previous implementation we made use of strings to store binary data that we were sending/receiving. But because of incompatibilities between Python 2 and 3 this didn’t fit very well. To make things neat for the API we found a container where we could store bytes that works with both Python 2 and 3, the bytearray. Even though we use the same type, there’s still some subtle differences in usage between the versions. After doing some testing we found ways where the syntax was the same for Python 2/3.

First of all bytearrays can be created from a string, tuple or list. When indexed by the [] operator it will give you the value of each byte.

>>> d = bytearray([i for i in range(10)])
>>> d
bytearray(b'\x00\x01\x02\x03\x04\x05\x06\x07\x08\t')
>>> d[5]
5

The main point is getting something meaningful out of the bytearray when doing the communication, here’s a few examples:

Unpacking a byte, an integer and a word from the first 7 bytes (little endian)

>>> struct.unpack("<BIH", a[:7])
(0, 67305985, 1541)

Getting a string from a subset of the data can be done by using decode and the char-set to use for decoding. We use ISO-8859-1 since the Crazyflie does not support Unicode (yet?).

>>> d = bytearray([i for i in range(97,100)])
>>> d
bytearray(b'abc')
>>> d.decode("ISO-8859-1")
'abc'

You can also easily get a tuple or a list:

>>> list(d)
[97, 98, 99]
>>> tuple(d)
(97, 98, 99)

And you can also concatenate:

>>> d + d
bytearray(b'abcabc')

And find a byte:

>>> d.find(bytearray((98, )))
1

But there’s also a few things we couldn’t get to work in a good way and have to check which version we’re running and execute different code, like the queue import that has changed name.

if sys.version_info < (3,):
    import Queue as queue
else:
    import queue

Another problem we haven’t solved is creating a bytearray from a string, so it’s also

if sys.version_info < (3,):
    self._data = bytearray(data)
else:
    self._data = bytearray(data.encode('ISO-8859-1'))

As for the client code that was ported to Python 3 without keeping the backwards compatibility there wasn’t any big issues. The biggest change was the PyQT4 API where there’s a few things that have improved when placing custom Python data in GUI objects. Before QVariant was used for this. You would create a QVariant object that wrapped the Python object. To get data out from the QVariant again you would have to explicitly say what type it had by calling the correct function (like toInt()). Now this is a lot smoother. QVariant has been skipped and you just use the Python type directly.

For more information have a look here where we found a lot of useful tips. Don’t hesitate to leave a comment if you think we could have done things differently or if you have any tips!

What’s not working

There’s still a few things we’re not sure how to fix and we have to look into it a bit more. These are:

  • There doesn’t seem to be any Python 3 bindings for the Leap Motion. According to this it’s possible to build the bindings yourself.
  • The Python 3 bindings to Marble for the GPS tab hasn’t been investigated yet

PEP-8

On a side note we’ve started using Travis CI (more on this next week) and will start creating unit-tests for the Crazyflie Python  API. As a first step we’re running PEP-8 on all the code. This will be checked automatically for all commits and pull-requests.


This weekend we went to the maker weekend at Hx in Helsingborg and showed off the Crazyflie 2.0 flying with the Kinect. It’s an awesome demo for fairs since it flies by itself and looks pretty good. Below is a few photos from the event.

But this time we ran into some issues with the set-up. When we first developed this we were running the image acquisition and processing on Linux using libfreenect2, but we later switched to Windows. The reason is these three lines. These lines map the depth measurement to the camera measurements and gives a set of “world-coordinates”. This is needed, since the distances left/right wouldn’t be correct without taking the distance away from the camera into consideration. Without it a left/right movement close to the camera would give a much larger response than one further away from the camera.

So to solve the issue above we moved everything to Windows, which would kind of solve the issue. But we started experiencing lag in the regulation, which originated from lag in the image processing. After doing some more digging we drew the conclusion that there was a USB issue when using the Crazyradio at the same time as the Kinect v2. Once every couple of minutes the FPS for the video will drop really low (which results in CPU usage going down as well). But disconnecting the Crazyflie (i.e not using the Crazyradio) seems to solve this issue. To work around this problem we currently have a set-up where we use two laptops. Since we’re running ZMQ to communicate between the applications it’s a quick operation to split it up on multiple hosts. So the Windows laptop runs image acquisition and processing and the Linux laptop runs the control-loop and Crazyflie client for sending the commands to the Crazyflie.

When we were first developing this there was lost of things happening in the libfrenect2 repo, so this might be implemented now. Does anyone have any tips for this? We would love to be able to run the system fully on Linux with only one laptop :-)

During the upcoming months we will be attending both the New York Maker Faire and the Berlin Maker Faire, hanging around the Seeedstudio booth. So if you want to see the Crazyflie/Kinect demo live or just to hang out and talk to us then drop by!

MF15NY_Badge1 icon_Berlin

A new version of the Crazyflie PC Python client has been released, version 2015.08. It’s been a while since the last release of the client so there’s a long list of changes, including lots of fixed bugs. The main new features are:

  • Student/Teacher mode:  It’s possible to use two input devices, where one can take over control from the other. This can be used for teaching or for working with a computer auto-pilot (doc)
  • Control the LED-ring from the Flight Tab:  Now it’s possible to turn on/off the headlights directly with a click and to select the LED-ring effect from a drop-down (doc)
  • New LED-tab to set custom patterns and intensity: Enables the user to individually set the color of each LED as well as the intensity of the LED-ring
  • ZMQ access to LED-ring memory and parameters: Write patterns for the LED-ring or set/get parameter values from an external application using JSON and ZMQ (doc)
  • ZMQ input device: Simulate a joystick by sending axis values in JSON via ZMQ. This can be used to implement a computer auto-pilot using for instance the Kinect (doc)
  • Switched from PyGame to PySDL2 on Mac OSX/Windows and native input device on Linux
  • WiiMote support

The next step after the release is to shape up the code a bit, so we’ve started using Travis for building and continuous integration. The long term goal is to run Flake8 and unit-tests on the code, but we still have a bit to go. The way we’re working towards this is by slowly enabling more and more checking in Travis, fixing one type of errors at a time.


DWM1000 nodes
Last hacking-Friday we have had some time to put together the DWM1000 boards we ordered during the summer. The DWM1000 from Decawave is an ultra-wide-band ieee802.15.4 radio transceiver that can very precisely timestamp packets arrival and departure. More simply it means that it is a standard and it can be used to implement a real time local positioning system: this could be really handy for the Crazyflie. We soldered all the boards and we got some basic ranging working on the nodes. The next step is to implement an opensource driver to be able to implement the ranging in the Crazyflie. We will keep you updated on the progress but in the mean time here is a photo of the prototypes:

DWM1000 nodes and deck


Things happening on the firmware side
Recently the commit rate for the Crazyflie 1.0/2.0 firmware has increased a lot. Some of it because of pull requests, great work, and some because we are starting to move in hacks and such on feature branches into the master branch. Our new college Kristoffer has taught us that having stuff on feature branches can be a bad idea, they tend to stay there. It is then better to have them compile switched and in the master branch as it is more visible and get a better chance of getting in for real.

Github crazyflie firmware contributions


Here are some of the recent thing going on:

  • A situation awareness framework originating from this pull request by fredgrat. It allows the Crazyflie 1.0/2.0 to react to triggers. Currently there is a free-fall, tumbled and at-rest detection. He recently also submitted an auto-takeoff functionality. Enable the functionality with the define here.
  • The beginning of a Arduino like API for the deck port. Currently GPIO and ADC are the only functions there but more will come.
  • Possibility to fly in rate (acrobatic) mode committed here. Support in the cfclient for this is being developed so currently one have to change the parameters to activate it manually.
  • Carefree, plus and X-mode implemented in firmware. There is also support for this being added to the cfclient.
  • Automatically switch to brushless driver. Motor driver being rewritten so it can be dynamically configured. This means that if the Crazylfie 2.0 is attached to the big-quad-deck it can automatically switch over to the brushless driver during power on.

Summertime are good times, less administration and more time to develop! As soon as things has been integrated and fully tested we will do a new release of the firmware and the cfclient :).

Starting this week we’re all back at our desks and after getting some time off, recharging our batteries, we’re slowly getting up to speed again. The summer has been spent on everything from improving our server environment to cleaning up both the firmware and the client. We’ve also been working on some new things, like the iOS bootloader and prototyping new decks for the Crazyflie 2.0.

Now it’s full speed ahead into an exiting fall with lots of things happening!

As a side note we are going to Maker Faire Berlin the 3&4th of October and we are planing to do a Bitcraze meet-up in Berlin while we are there. We started a thread in the forum to talk about it.

Big Quad Deck
Today we received the revised big-quad-deck PCBs. We made the connectors fit a bit better, and fixed the deck port connectors being mirrored,  and it is starting to look quite good. Next up is to implement the firmware functionality, which is the biggest work. If you have any ideas or suggestions on the design please let us know!

Big-quad-deck v2

Big-quad-deck v2 mounted


A while ago we implemented something we called mux-mode for controllers, where the Crazyflie can be controlled from multiple controllers at once. Initially it was implemented the day before a “bring-your-kids-to-work” day at Minc (where our office is). The idea was that the kids would control roll/pitch from one controller and we would control thrust/yaw from another controller. But we would also have the possibility to take over roll/pitch by holding a button on our controller. It was a big hit and let’s just say the “take-over” functionality came in handy :-)

A couple of months later we started working with the Kinect v2 with the goal of automatically piloting the Crazyflie using it. Again the input-mux feature came in handy. Instead of having the kids controlling the roll and pitch, the autopilot was now doing it. This enabled us to work on one problem at a time, first roll/pitch then yaw and finally thrust. When we were finished the autopilot was controlling all of the axes and we just used the “take-over” functionality when things got out of control.

So far this functionality has been disabled by default, but last week we fixed it up and enabled the code. With this change we’ve renamed the feature to teacher/student and also changed the way mappings are selected for the client. Below is a screenshot of the new menu, but have a look at the wiki for more details. If you want to try it out, pull the latest version on the development branch. It’s a great feature if you know someone that want’s to try flying for the first time!

On a side-note we tried some other ways to mix the controllers, like one we called “mix-mux”. This would take the input from two devices and add them together, so if both give 25% thrust the total would be 50%. It was really fun to try, but impossible to fly (maybe we need to work on our communication skills…).

Continuing from last Monday post where the hardware wiring part was discussed we now move on to the software side. The brushed motors are controlled with a normal PWM  where the duty cycle will adjust how much power goes into the motors. A brushless motor on the other hand needs more complicated controlling and uses it’s own micro-controller to handle this. These brushless motor controllers (BLMC or Brushless ESC) comes in many flavors and sizes but what is pretty common is how they are interfaced/controlled. This is inherited from how R/C receivers are controlling servos and how the receiver gets updates from the transmitter. This is a PWM where the width of the high pulse define the duty cycle. 1ms equals min and 2ms equals max and this is repeated every 20ms, thus giving an update rate of 50Hz.ServoPwm

This way of interfacing the BLMC is currently the most common way but interfacing with I2C, CAN, etc is getting more common.

To generate the servo PWM on the Crazyflie we have just reconfigured the timer a bit using a conversion macro so that setting the motor ratio of zero will result in a 1ms high pulse and setting it to max (uint16) will result in a 2ms pulse. The period time can be set with the BLMC_PERIOD define in motors.h. The standard period time of 20ms is actually a big drawback as it adds a latency from when a new output is calculated to when it is actually set. Therefore many motor controllers allow to shrink this period down to 2.5ms (400Hz) which result in lower latency and better flight stability.

Brushless prototype board

First you need to put together the brushless prototype board from the last post. The output will be generated on the pins marked BLMC 1,2,3,4 which should be connected in the same position an rotational direction as the brushed M1, M2, M3, M4 respectively. The output signal will be 0v – 3.0v which should work fine with 5V BLMC but it might be worth keeping that in mind.

BL proto descr

Building the brushless firmware

The code which contains the brushless functionality is currently on the bigmerge branch so start by pulling the latest changes and switching to that branch.

git pull
git checkout bigmerge

Then to activate the brushless functionality enable the brushless defines

BRUSHLESS_MOTORCONTROLLER
BRUSHLESS_PROTO_DECK_MAPPING

This can be done by by either creating defines in config.h or by creating  aconfig.mk file in the same directory as the Makefile with the content:

CFLAGS += -DBRUSHLESS_MOTORCONTROLLER
CFLAGS += -DBRUSHLESS_PROTO_DECK_MAPPING

The period time BLMC_PERIOD is by default set to 2.5ms (400Hz) so change that if needed.

Then build the firmware (make sure to clean first)

make clean
make

It will build for the Crazyflie 2.0 and for wireless bootloading by default. Put the Crazyflie 2.0 in bootloader mode by holding the power button until the blue led start to blink, then flash it with the wireless bootloader (Crazyradio required).

make cload

Causion!

You are now probably dealing with powerful and dangerous stuff so make sure to take precautions. E.g. don’t have propellers mounted when you test! When you have taken all the safety precautions do your first test. Remember the Crazyflie firmware has not yet been developed for big quads, it is all at your own risk! And another thing, even though the Crazyflie 2.0 can be controlled using a mobile device we don’t recommend this, use a Crazyradio.

Tuning

With that cautions being said it is great seeing a big quad fly and we will soon put out a video showing some of our builds. Our bigger quads have flown quite well with the stock tuning (PID parameters) but tuning should be done as well. Plenty of guides can be found on ways how to do it so I will not go into details here. The values can be found in pid.h and can be updated (but not saved) live using the cfclient. To save them the pid.h file must be changed and the firmware flashed again.

Recently I got a Chromebook, mostly out of curiosity for this odd “computer that runs only a web browser”. While playing with Google dev tools I quickly saw a possibility to make a Crazyflie client as a Chrome app: the Chrome API provides USB connectivity,and HTML5 has a javascript gamepad API. A chrome app is designed to look and feel like a native application: the app does not require internet connection and is launched in its own window.

This week-end I finally got around to test it, it’s not pretty but it works :-)

crazyflie_chrome_client

The current functionality is:

  • Channel and datarate can be changed
  • Read input from a gamepad, the mapping is fixed to mode 3 and the sensitivity is fixed
  • Sends set-points to Crazyflie 33 times per seconds.

I haven’t had time to do any layout work on it (that is pretty obvious in the screenshoot :) ), but the plan is to use Angular Material to handle the GUI.

This is only a proof of concept but we are seeing a lot of potential: the Chrome app runs on Linux, Mac, Windows and Chromebook, is easy to install and is written in HTML/CSS/Javascript which seems to be a very popular platform nowadays.

I have pushed the code on Github so if anyone is interested in helping to shape up the app head to the forum to read the discussion about it.