aerial robotics

You might remember that at the beginning of this summer, we were invited to do a skill-learning session with the Crazyflie at the Robotics Developer Day 2024 (see this blog post) organized by The Construct. We showed the Crazyflie flying with the multi-ranger deck, capable of mapping the room in both simulation and the real world. Moreover, we demonstrated this with both manual control and autonomous wall-following. Since then, we wanted to make some improvements to the simulation. We now present an updated tutorial on how to do all of this yourself on your own machine.

This tutorial will focus on using the multi-ranger ROS 2 nodes for both mapping and wall-following in simulation first, before trying it out on the real thing. You will be able to tune settings to your specific environment in simulation first and then use exactly the same nodes in the real world. That is one of the main strengths of ROS, providing you with that flexibility.

We have made a video of what to expect of the tutorial, for which you should use this blogpost for the more detailed instructions.

Watch this video first and then again with the instructions below

What do you need first?

You’ll need to setup some things first on the PC and acquire hardware to follow this tutorial in full:

PC preparation

You’ll need to install ROS 2 and Gazebo simulator maintained by the Open Robotics foundation on an Ubuntu machine.

  • Ubuntu 22.04 on a 64-bit x86 device (no ARM)
  • ROS 2 Humble – Install it via these instructions
  • Gazebo Harmonic – Install via these instructions This is not the recommended Gazebo for humble but we will install the specific ROS bridge for this later. Just make sure that you don’t have gazebo classic installed on your machine.

Hardware

You’ll need to components at least of the STEM ranging bundle

If you have any different setup of your computer or positioning system, it is okay as the demos should be simple enough to work, but, be prepared for some warning/error handling that this tutorial might have not covered.

Time to complete:

This is an approximation of how much time you need to complete this tutorial, depended on your skill level, but if you already have experience with both ROS 2/Gazebo and the Crazyflie it should take 1 hour.

If you have the Crazyflie for the first time, it would probably be a good idea to go through the getting started tutorial and connect to it with a CFclient with the Flowdeck and Multi-ranger deck attached as a sanity check if everything is working before jumping into ROS 2 and Gazebo.

Some things holds for ROS 2! It would be handy to go through the ROS 2 Humble beginner tutorials before starting.

1. Installation

This section will install 4 packages:

Make the workspaces for both simulation and ROS. You can use a different directory for this

mkdir ~/crazyflie_mapping_demo
cd crazyflie_mapping_demo
mkdir simulation_ws
mkdir ros2_ws
cd ros2_ws
mkdir src

Let’s clone the repositories in their right location, starting with simulation

cd ~/crazyflie_mapping_demo/simulation_ws
git clone https://github.com/bitcraze/crazyflie-simulation.gitCode language: JavaScript (javascript)

Then navigate to the ROS2 workspace source folder and clone 3 projects:

cd ~/crazyflie_mapping_demo/ros2_ws/src
git clone https://github.com/knmcguire/crazyflie_ros2_multiranger.git
git clone https://github.com/knmcguire/ros_gz_crazyflie
git clone https://github.com/IMRCLab/crazyswarm2 --recursiveCode language: PHP (php)

First install certain requirements as apt-get packages and pip libraries (might want to make a python environment for the latter)

sudo apt-get install libboost-program-options-dev libusb-1.0-0-dev python3-colcon-common-extensions
sudo apt-get install ros-humble-motion-capture-tracking ros-humble-tf-transformations
sudo apt-get install ros-humble-ros-gzharmonic ros-humble-teleop-twist-keyboard
pip3 install cflib transform3D Code language: JavaScript (javascript)

Also follow the instructions to give the proper rights to the Crazyradio 2.0 in this guide, but if this is your first time of working with the Crazyradio 2.0 first follow this tutorial.

Go to the ros2_ws workspace and build the packages

cd  ~/crazyflie_mapping_demo/ros2_ws/
source /opt/ros/humble/setup.bash
colcon build --cmake-args -DBUILD_TESTING=ONCode language: JavaScript (javascript)

Building will take a few minutes. Especially Crazyswarm2 will show a lot of warnings and std_err, but unless the package build has ‘failed’, just ignore it for now until we have proposed a fix to that repository.

If the build of all the packages passes and non failed, please continue to the next step!

2. Simple mapping simulation

This section will explain how to create a simple 2D map of your environment using the multi-ranger. The ROS 2 package designed for this is specifically made for the multi-ranger, but it should be compatible with NAV2 if you’d like. However, for now, we’ll focus on a simple version without any localization inferred from the map.

Open up a terminal which needs to be sourced for both the gazebo model and the newly build ROS 2 packages:

source ~/crazyflie_mapping_demo/ros2_ws/install/setup.bash
export GZ_SIM_RESOURCE_PATH="/home/$USER/crazyflie_mapping_demo/simulation_ws/crazyflie-simulation/simulator_files/gazebo/"Code language: JavaScript (javascript)

First lets be safe and start with simulation. Startup the ROS 2 launch files with:

ros2 launch crazyflie_ros2_multiranger_bringup simple_mapper_simulation.launch.pyCode language: CSS (css)

If you get a ‘No such file or directory’ error on the model, try entering the full path in GZ_SIM_RESOURCE_PATH export.

Gazebo will start with the Crazyflie in the center. You can get a close-up of the Crazyflie by right-clicking it in the Entity tree and pressing ‘Move to’. You can also choose to follow it, but the camera tracking feature of Gazebo needs some tuning to track something as small as the Crazyflie. Additionally, you will see RVIZ starting with the map view and transforms preconfigured.

Open up another terminal, source the installed ROS 2 distro and open up the ROS 2 teleop keyboard node:

source /opt/ros/humble/setup.bash
ros2 run teleop_twist_keyboard teleop_twist_keyboard

Have the Crazyflie take off with ‘t’ on your keyboard, and rotate it around with the teleop instructions. In RVIZ you should see the map being created and the transform of the Crazyflie moving. You should be able to see this picture, and in this part of the video.

Screenshot of the Crazyflie in Gazebo generating a map with Teleop (video)

3. Simple mapping real world

Now that you got the gist of it, let’s move to the real Crazyflie!

First, if you have a different URI of the Crazyflie to connect to, first change the config file ‘crazyflie_real_crazyswarm2.yaml’ in the crazyflie_ros2_repository. This is a file that Crazyswarm2 uses to know to which Crazyflie to connect to.

Open up the config file in gedit or your favorite IDE like visual code:

gedit ~/crazyflie_mapping_demo/ros2_ws/src/crazyflie_ros2_multiranger/crazyflie_ros2_multiranger_bringup/config/crazyflie_real_crazyswarm2.yamlCode language: JavaScript (javascript)

and change the URI on this line specifically to the URI of your Crazyflie if necessary. Mind that you need to rebuild ros2_ws again to make sure that this has an effect.

Now source the terminal with the installed ROS 2 packages and the Gazebo model, and launch the ROS launch of the simple mapper example for the real world Crazyflie.

source ~/crazyflie_mapping_demo/ros2_ws/install/setup.bash
export GZ_SIM_RESOURCE_PATH="/home/$USER/crazyflie_mapping_demo/simulation_ws/crazyflie-simulation/simulator_files/gazebo/"
ros2 launch crazyflie_ros2_multiranger_bringup simple_mapper_real.launch.py
Code language: JavaScript (javascript)

Now open up another terminal, source ROS 2 and open up teleop:

source /opt/ros/humble/setup.bash
ros2 run teleop_twist_keyboard teleop_twist_keyboard

Same thing, have the Crazyflie take off with ‘t’, and control it with the instructions.

You should be able to see this on your screen, which you can also check with this part of the video.
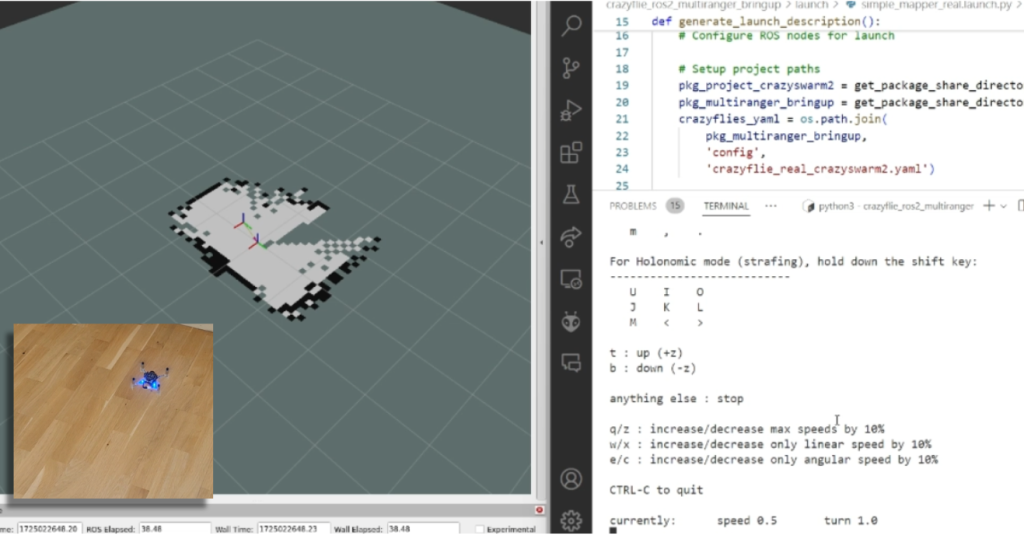
Screen shot of the real Crazyflie mapping while being controlled with ROS 2 teleop (video)

Make the Crazyflie land again with ‘b’, and now you can close the ROS 2 node in the launch terminal with ctrl + c.

4. Wall following simulation

Previously, you needed to control the Crazyflie yourself to create the map, but what if you could let the Crazyflie do it on its own? The `crazyflie_ros2_multiranger` package includes a `crazyflie_ros2_multiranger_wall_following` node that uses laser ranges from the multi-ranger to perform autonomous wall-following. Then, you can just sit back and relax while the map is created for you!

Let’s first try it in simulation, so open up a terminal and source it if you haven’t already (see section of the Simple mapper simulation). Then launch the wall follower ROS 2 launch file:

ros2 launch crazyflie_ros2_multiranger_bringup wall_follower_mapper_simulation.launch.pyCode language: CSS (css)

Take off and wall following will go fully automatic. The simulated Crazyflie in Gazebo will fly forward, stop when it sees a wall with it’s forward range sensor and follow the wall on its left-hand side.

You’ll see on RVIZ2 when the full map is created like here below and this part of the tutorial video.

Screenshot of the simulated Crazyflie in Gazebo mapping will autonomously wall following (video)

You can stop the simulated Crazyflie by the following service call in another terminal that is sourced with ROS 2 humble.

ros2 service call /crazyflie/stop_wall_following std_srvs/srv/Trigger

The simulated Crazyflie will stop wall following and land. You can also just close the simulation, since nothing can happen here.

5. Wall following real world

Now that we have demonstrated that the wall-following works in simulation, we feel confident enough to try it in the real world this time! Make sure you have a fully charged battery, place the Crazyflie on the floor facing the direction you’d like the positive x-axis to be (which is also where it will fly first), and turn it on.

Make sure that you are flying with a room with clear defined walls and corners, or make something with cardboard such as a mini maze, but the current algorithm is optimized to just fly in a squarish room.

Source the ROS 2 workspace like previously and start up the wall follower launch file for the

ros2 launch crazyflie_ros2_multiranger_bringup wall_follower_mapper_real.launch.pyCode language: CSS (css)

Like the simulated Crazyflie, the real Crazyflie will take off automatically and automatically do wall following, so it is important that it is flying towards a wall. It should look like this screenshot, or you can check it with this part of the video.

The real crazyflie wall following autonomously while mapping the room (video).

Be careful here to not accidently run this script with the Crazyflie sitting on your desk!

If you’d like the Crazyflie to stop, don’t stop the ROS2 nodes with ctrl-c, since it will continue flying until crash. It’s not like simulation unfortunately where you can close the environment and nothing will happen. Instead, use the ROS 2 service made for this in a different terminal:

ros2 service call /crazyflie_real/stop_wall_following std_srvs/srv/Trigger

Similar the real Crazyflie will stop wall following and land. Now you can close the ROS 2 terminals and turn off the crazyflie.

Next steps?

We don’t have any more demos to show but we can give you a list of suggestions of what you could try next! You could for instance have multiple Crazyflies mapping together like in the video shown here:

This uses the mapMergeForMultiRobotMapping-ROS2 external project, which is combined with Crazyswarm2 with this launch file gist. Just keep in mind that, currently, it would be better to use a global positioning system here, such as the Lighthouse positioning system used in the video. Also, if you’d like to try this out in simulation, you’ll need to ensure different namespaces for the Crazyflies, which the current simulation setup may not fully support.

Another idea is to connect the NAV2 stack instead of the simple mapper. There exists a couple of instructions on the Crazyswarm2 ROS2 tutorials so you can use those as reference. Check out the video below here.

Moreover, if you are having difficulties setting up your computer, I’d like to remind you that the skill-learning session we conducted for Robotics Developer Day was entirely done using a ROSject provided by The Construct, which also allows direct connection with the Crazyflie. The only requirement is that you can run Crazyswarm2 on your local machine, but that should be feasible. See the video of the original Robotics Developer Day skill-learning session here:

The last thing to know is that the ROS 2 nodes in this tutorial are running ‘offboard,’ so not on the Crazyflies themselves. However, do check out the Micro-ROS examples for the Crazyflie by Eprosima whenever you have the time and would like to challenge yourself with embedded development.

That’s it, folks! If you are running into any issues with this tutorial or want to bounce some cool ideas to try yourself, start a discussion thread on https://discussions.bitcraze.io/.

Happy hacking!

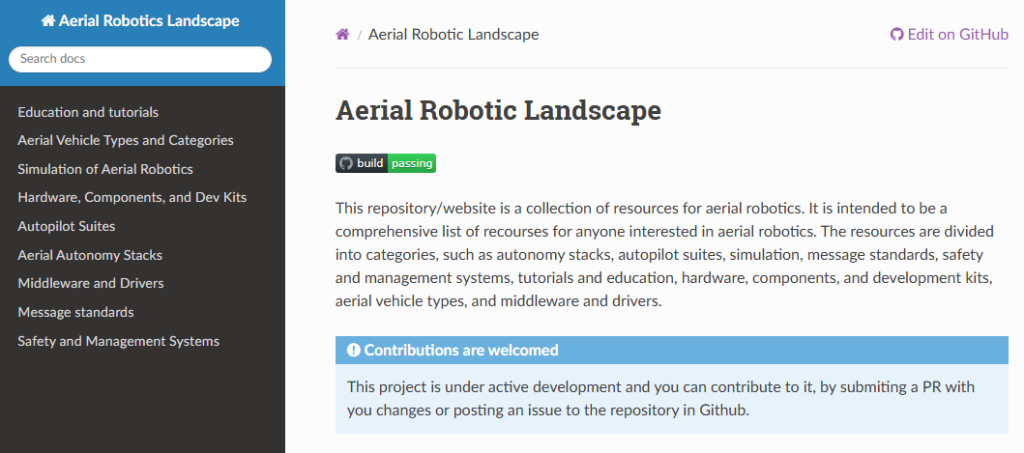
It’s been over a little year since we started the ROS Aerial Robotics community group together with the Drone Code Foundation, and it is still going strong (blogpost 1, blogpost 2). Since there is a nice mix of people joining the meetings from different backgrounds and drone operating systems, we have had quite a few discussions and overviews of various topics. For instance, we’ve explored courses in Aerial Robotics and other subjects in previous meetings. An important goal of the group has been to make it easier for people to get started with flying robotics, which we’ve achieved by collecting essential information in the ‘Aerial Robotic Landscape’.

Starting out in Aerial Robotics

Let’s cut to the chase: Aerial Robotics is a very challenging field to get started in. Not only do you need a comprehensive understanding of which hardware to acquire, but users also face a multiple choices. These decisions include selecting the right autopilot, simulator for testing ideas, and necessary sensors to achieve autonomy. Unlike the well-established Turtlebot in other robotics domains, there isn’t a universally accepted and field-tested getting-started development drone in the aerial robotics world. While we at Bitcraze would love everyone to go for the Crazyflie, we recognize its limitations. Like, it may not handle outdoor flights with GPS or carry heavy cameras effectively. Our goal, as the ‘Aerial Robotics Community group,’ is to make it easier for beginners by providing users with information about the hardware and software they truly need.

Drone Code Foundation and Bitcraze AB had a keynote speech together at ROSCon 2023 about getting started in Aerial Robotics called ‘Up, Up, and Away: Adventures in Aerial Robotics’. Please take a look at the talk here on Vimeo.

The Aerial Robotics Landscape website

The Aerial Robotics Landscape serves as a repository of information related to all things Aerial Robotics. It started out in the GitHub repository, and it grew due to the discussions held at the aerial robotics community group meetings. Additionally, contributions from both group members and external contributors have played an important role (you can explore the merged PRs).

As the pages and tables expanded, it became clear that a better representation was necessary than just the mere README documentation on the GitHub repository. The group therefore experimented with MKDocs, creating a website in the ‘Read the Docs’ theme. This is a similar theme that important packages within in the ROS ecosystem use, such as the ROS documentation, as well as ROS 2 packages like Nav2 and Crazyswarm2.

Please take a look at the rendered website here: https://ros-aerial.github.io/aerial_robotic_landscape/

Please contribute!

The Aerial Robotics Landscape is a dynamic , where development kits emerge while others are discontinued, new simulators rise while some remain unsupported, and autopilot and autonomy features evolve monthly. This ever-changing landscape demands constant updates and additions. We try to do this to the best of our ability, but we can’t do it alone — we need your help.

If you believe that your favorite hardware platform is missing from the landscape, or if you’ve recently developed a new planning algorithm for fixed-wing vehicles or created a YouTube course on optical-based flight, please contribute by means of a pull request to the GitHub repository. We’ve put together a guide on how to contribute to the Aerial Robotics Landscape here. Let’s make the website useful together!

If you’d like to join the ROS aerial Robotics meetings, please take a look at our community github repository for joining information. The next meeting is the 5th of June, 4 PM UTC and was announced on ROS discourse.

A while ago, we wrote a generic blog post about state estimation in the Crazyflie, mostly discussing different ways the Crazyflie can determine its attitude and/or position. At that time, we only had the Complementary filter and Extended Kalman filter (EKF). Over the years, we’ve made some great additions like the M-estimation-based robust Kalman filter (an enhancement of the EKF, see this blog post) and the Unscented Kalman filter.

However, we have noticed that some of our beginning users struggle with understanding the concept of Kalman filtering, depending on whether this has been covered in their curriculum. And for some more experienced users, it might be nice to have a recap of the basics as well, since this is a very important part of the Crazyflie’s capabilities of flight (and also for robotics in general). So, in this blog post, we will explain the principles of Kalman filtering and how it is applied within the Crazyflie firmware, which hopefully will provide a good base for anyone starting to delve into state estimation within the Crazyflie.

We will also have a developer meeting about Kalman filtering on the Crazyflie, so we hope you can join that as well if you have any questions about how it all works. Also we are planning to got to FOSdem this weekend so we hope to see you there too.

Main Principles of the Kalman Filter

Anybody remotely working with autonomous systems must, at one point, have heard of the Kalman filter, as it has existed since the 60s and even played a role in the Apollo program. Understanding its main principles is also important for anyone working with drones or robotics. There are plenty of resources available, and its Wikipedia page is filled with examples, so here we will focus mostly on the concept and principles and leave the bulk of the mathematics as an exercise for those who like to delve into that :).

So basically, there are several principles that apply to a Kalman filter:

  • It estimates a linear system that is driven by stochastic processes. The probability function that drives these stochastic processes should ideally be Gaussian.
  • It makes use of the Bayes’ rule, which is a general term in statistics that describes the probability of an event happening based on previous knowledge related to that event.
  • It assumes that the ‘to be estimated state’ can be described with a Markov model, which assumes that a sequence of the next possible event (or scenario) can be predicted by the current event. In other words, it does not need a full history of events to predict the next step(s), only the information from the event of one previous step.
  • A Kalman filter is described as a recursive filter, which means that it reuses (part of) its output as input for the next filtering step.

So the state estimate is usually a vector of different variables that the developer or user of the system likes to observe, for either control or prediction, something like position and velocity, for instance: [x, y, , ẏ, …]. One can describe a dynamics model that can predict the state in the next step using only the current time step’s state, like for instance: xt+1 = xt + t, yt+1 = yt + ẏt. This can also be nicely described in matrix form as well if you like linear algebra. To this model, you can also add predicted noise to make it more realistic, or the effect of the input commands to the system (like voltage to motors). We will not go into the latter in this blogpost.

The Concept of Kalman filters

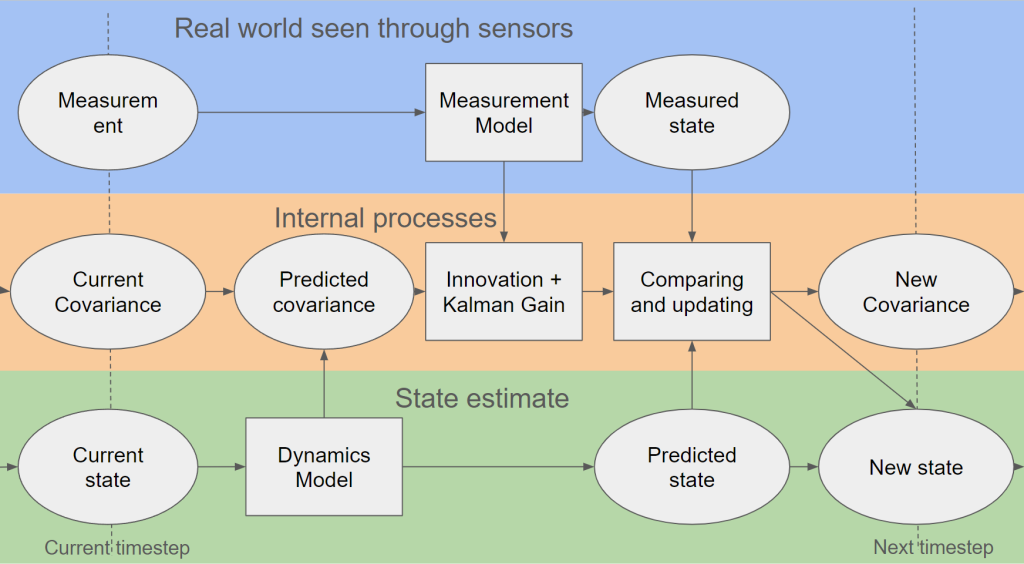
Simplified block scheme of Kalman filtering

So, we will go through the process of explaining the steps of the Kalman filter now, which hopefully will be clear with the above picture. As mentioned before, we’d like to avoid formulas and are oversimplifying some parts to make it as clear as possible (hopefully…).

First, there is the predict phase, where the current state (estimate) and a dynamics model (also known as the state transition model) result in a predicted state. Also in the same phase, the predicted estimated covariance is calculated, which also uses the dynamics model plus an indication of the process noise model, indicating how much the dynamics model deviates from reality in predicting that state. In an ideal world and with an ideal model, this could be enough; however, no dynamics model is perfect, which is why the next phase is also very important.

Then it’s the update phase, where the filter estimate gets updated by a measurement of the real world through sensors. The measurement needs to go through a measurement model, which transforms the measurement into a measured state (also known as innovation or measurement pre-fit residual). Usually, a measurement is not a 1-1 depiction of one variable of the state, so the measurement model ensures that the measurement can properly be compared to the predicted state. This same measurement model, accompanied by the measurement noise model (which indicates how much the measurement differs from the real world), together with the predicted covariance, is used to calculate the innovation and Kalman gain.

The last part of the update phase is where the predictions are updated with the innovation. The Kalman gain is then used to update the predicted state to a new estimated state with the measured state. The same Kalman gain is also used to update the covariance, which can be used for the next time step.

An 1D example, height estimation

It’s always good to show the filter in some form of example, so let’s show you a simple one in terms of height estimation to demonstrate its implications.

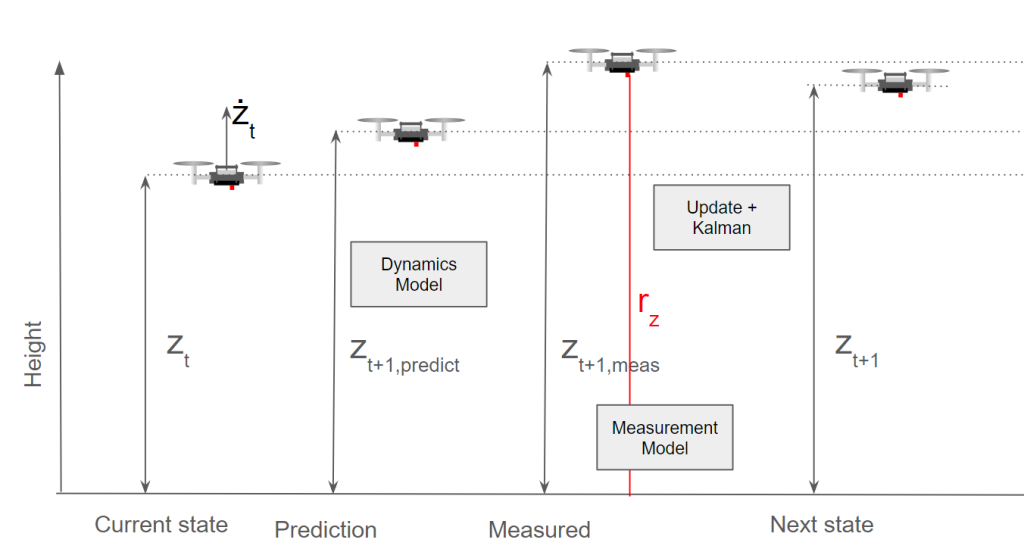
1D example of height estimation

You see here a Crazyflie flying, and currently it has its height estimated at zt and its velocity at żt. It goes to the predict phase and predicts the next height to be at zt+1,predict, which is a simple model of just zt + żt. Then for the innovation and updating phase, a measurement (from a range sensor) rz is used for the filter, which is translated to zt+1, meas. In this case, the measurement model is very simple when flying over a flat surface, as it probably is only a translation addition of the sensor to the middle of the Crazyflie, or perhaps a compensation for a roll or pitch rotation.

In the background, the covariances are updated and the Kalman gain is calculated, and based on zt+1,predict and zt+1, meas, the next state zt+1 is calculated. As you probably noticed, there was a discrepancy between the predicted height and measured height, which could be due to the fact that the dynamics model couldn’t correctly predict the height. Perhaps a PID gain was higher than expected or the Crazyflie had upgraded motors that made it climb faster on takeoff. As you can see here, the filter put the estimated height closer to zt+1 to the measurement than the predicted height. The measurement noise model incorporated into the covariances indicates that the height sensor is more accurate than the height coming from the dynamics model. This would very well be the case for an infrared height sensor like the one on the Flow Deck; however, if it were an ultrasound-based sensor or barometer instead (which are much noisier), then the predicted height would be closer to the one predicted by the dynamics model.

Also, it’s good to note that the dynamics model does not currently include the motor input, but it could have done so as well. In that case, it would have been better able to predict the jump it missed now.

A 2D example, horizontal position

A 2D example in x and y position

Let’s take it up a notch and add an extra dimension. You see here now that there is a 2D solution of the Crazyflie moving horizontally. It is at position xt, yt and has a velocity of t, ẏt at that moment in time. The dynamics model estimates the Crazyflie to end up in the general direction of the velocity factor, so it is a simple addition of the current position and velocity vector. If the Crazyflie has a flow sensor (like on the Flow Deck), flow fx, fy can be detected and translated by the measurement model to a measured velocity (part of the state filter) by combining it with a height measurement and camera characteristics.

However, the measurement in the form of the measured flow fx, fy estimates that there is much more flow detected in the x-direction than in the y-direction. This can be due to a sudden wind gust in the y-direction, which the dynamics model couldn’t accurately predict, or the fact that there weren’t as many features on the surface in the y-direction, making it more difficult for the flow sensor to measure the flow in that direction. Since this is not something that both models can account for, the filter will, based on the Kalman gain and covariances, put the estimate somewhere in between. However, this is of course dependent on the estimated covariances of both the outcome of the measurement and dynamic models.

In case of non-linearity

It would be much simpler if the world’s processes could be described with linear systems and have Gaussian distributions. However, the world is complex, so that is rarely the case. We can make parts of the world more abstract in simulation, and Kalman filters can handle that, but when dealing with real flying vehicles, such as the Crazyflie, which is considered a highly nonlinear system, it needs to be described by a nonlinear dynamics model. Additionally, the measurements of sensors in more complex and 3D situations usually don’t have a one-to-one linear relationship with the variables in the state. Can you still use the Kalman filter then, considering the earlier mentioned principles?

Luckily certain assumptions can be made that can still make Kalman filters useful in the sense of non-linearity.

  • Extended Kalman Filter (EKF): If there is non-linearity in either the dynamics model, measurement models or both, at each prediction and update step, these models are linearized around the current state variables by calculating the Jacobian, which is a collection of first-order partial derivative calculations of the model and the state variables.
  • Unscented Kalman Filter (UKF): An unscented Kalman filter deals with linearities by selecting sigma points selected around the mean of the state estimate, which are backpropagated through the non-linear dynamics model.

However, there is also the case of non-Gaussian processes in both dynamics and measurements, and in that case a complementary filter or particle filter would be best suited. The Crazyflie contains a complementary filter (which does not estimate x and y), an extended Kalman filter and an experimental unscented Kalman filter. Check out the state-estimation documentation for more information.

So…. where is the code?

This is all fine and dandy, however… where can you find all of this in the code of the Crazyflie firmware? Here is an overview of where you can find it exactly in the sense of the most used filter of them all, namely the Extended Kalman Filter.

There are several assumptions made and adjustments made to the regular EKF implementation to make it suitable for flight on the Crazyflie. For those details I’d like to refer to the papers on where this implementation is based on, which can be found in the EKF documentation. Also for a more precise explanation of Kalman filter, please check out the lecture slides of Stanford University on Linear dynamical systems or the Linköping university’s course slides on Sensor Fusion.

Update: From the comments we also got notified of an nice EKF tutorial where you write the filter from scratch (github) from Prof. Simon D. Levy from Washington and Lee university. Practice makes perfect!

Next Developer meeting and FOSdem

As you would have guessed, our next developer meeting will be about the Kalman filters in the Crazyflie. Keep an eye on this Discussion thread for more details on the meeting.

Also Kimberly and Arnaud will be attending FOSdem this weekend in Brussels, Belgium. We are hoping to organize an open-source robotics BOF/meetup there, so please let us know if you are planning to go as well!

In our ROS-aerial community working group, we had a meeting a few weeks ago to discuss education and tutorials within Aerial Robotics (see the ROS discourse thread here). The general conclusion was that there should be more courses and tutorials since the learning curve is too steep. But… is that actually the case? According to a LinkedIn post by Kimberly, asking for suggestions, we found out that might not be true! There are loads of tutorials out there! So in this blog post, we will provide an overview of the suggested tutorials and the ones that have materials available online.

Stable diffusion with prompt ‘A drone flying in front of a school blackboard’

Online books

One of the first suggestions was to explore the online free book titled ‘Small Unmanned Aircraft: Theory and Practice.’ This book has been written by Randy Beard and Tim McLain of Brigham Young University, and it covers everything from the absolute basics of coordinate frames and quadrotor dynamics to path planning and cameras. It is a must-read for anybody starting in UAVs and Aerial robotics.

The physical book can be found here: http://press.princeton.edu/titles/9632.html

The available PDFs can be accessed on GitHub: https://github.com/randybeard/uavbook

Courses specified on Aerial Robotics

Here are some suggestions for courses specifically focused on Aerial Robotics. These received the most recommendations! Many universities have made their courses available online, accessible to anyone interested.

Coursera offers the ‘Robotics: Aerial Robotics’ course as part of the Robotics specialization. Taught by Prof. Vijay Kumar from Penn University, this 4-week course covers the mechanics and control of aerial vehicles using Matlab. It starts from 1 dimension and gradually progresses to the 3rd dimension in simulation. The course is part of a paid educational program, but you can audit the lessons for free.

Link: https://www.coursera.org/learn/robotics-flight

Udacity has been offering a course on Aerial Vehicles for quite some time. The lessons are taught by top names in the industry and cover key aspects of Aerial Robotics, such as motion planning, controls, and estimation, with lab assignments involving a real drone. The course duration is 4 months, and access is available for a fee.

Link: https://www.udacity.com/course/flying-car-nanodegree–nd787

The University of Maryland offers a course on Autonomous Aerial Robotics, making all videos, slides, and assignments available. Taught by Nitin J. Sanket and Chahat Deep Singh, the course covers everything from basic control and dynamics to full autonomy. It’s a comprehensive resource for aerial robotics. The course utilizes the Parrot Bebop 2.0, and while a Mocap system is required, you may explore the possibility of adapting the course to a different platform.

Link: http://prg.cs.umd.edu/enae788m

Additionally, there’s the course ‘Applied Control System 3: UAV Drone (3D Dynamics & Control)’ which is part of a series by Mark Misin. This course delves deep into the dynamics, control, and modeling of quadrotors.

Link: https://www.udemy.com/course/applied-control-systems-for-engineers-2-uav-drone-control/

Courses specified on Robotics applied to UAVs

Here are some suggestions for courses that focus on robotics but utilize UAVs/drones to demonstrate the implementation of the studied materials.

‘Visual Navigation For Autonomous Vehicles’ is a course available on MIT Open Courseware, taught by Prof. Luca Carlone. As the name implies, the course primarily focuses on autonomous navigation for any autonomous vehicle. It includes exercises where students implement vision algorithms on both ground robots and drones. Additionally, the course covers working with ROS and applying the knowledge to a simulated drone in Unity.

Link: https://ocw.mit.edu/courses/16-485-visual-navigation-for-autonomous-vehicles-vnav-fall-2020/

The ‘Bio-inspired Robotics’ course at the University of Washington, led by Prof. Sawyer Fuller, explores the realm of drawing inspiration from nature rather than reinventing the wheel. It covers various robots inspired by creatures capable of swimming, walking, hopping, and of course, flying. Lab assignments in this course involve working with a Crazyflie drone.

Link: https://faculty.washington.edu/minster/bio_inspired_robotics/

Brown University offers a course called ‘Introduction to Robotics,’ taught by Prof. Stefanie Tellix. While the introduction covers generic robotics, the focus of the full course is on building and programming the Duckiedrone. The course dives straight into autonomy and also teaches students how to work with ROS.

Link: https://cs.brown.edu/courses/cs1951r/

Update (4th of July)

Princeton University (see this blogpost) have also decided to release their ‘Intro to Robotics’ lectures and materials for the public. Can’t believe I forgot this one!

Link: https://irom-lab.princeton.edu/intro-to-robotics/

Youtube tutorials

If you’d like to start hands-on right away, here are a couple of suggestions for YouTube tutorials or series about aerial robotics.

Drone Programming with Python: This popular tutorial/course teaches viewers how to program a real drone using Python with the DJI Tello. It offers a great opportunity for anyone looking for a short and enjoyable project to undertake, especially on a rainy day, while still working with a real platform.

Link: https://youtu.be/LmEcyQnfpDA

Intelligent Quads YouTube Channel: This channel is entirely dedicated to creating autonomous UAVs, covering topics from Ardupilot to MAVlink to ROS and Gazebo. It appears to be a valuable resource for beginners in the field of autonomous UAVs.

Link: https://www.youtube.com/@IntelligentQuads

But wait, there is more!

There are some extra recourses for you to also take a look at.

  • Self-Driving Car Specialization: If you are interested in learning more about SLAM (Simultaneous Localization and Mapping) and sensors, this specialization is tailored for self-driving cars but the theory can be useful for drones as well. Link: https://www.coursera.org/specializations/self-driving-cars
  • Drone Dojo: For those looking to build their own drones, Drone Dojo provides useful instructions and courses to get started on DIY drone projects. Link: https://dojofordrones.com/

To conclude

Indeed, it appears that there are plenty of courses and tutorials available for people interested in getting started with aerial robotics. The range of resources is vast, and it’s possible that we might still be missing some, which could lead to a part 2 of this blog post in the future! And perhaps also we would need to delve into these to see why the learning curve is considered steep. However, aerial robotics is not an easy subject anyway so perhaps it is good to start from the basics. Nevertheless, this compilation should provide a solid starting point for anyone eager to delve into the world of aerial robotics. A major thank you to everyone who has contributed so far (linked to in the original LinkedIn post); your valuable input has made this possible!

If you have been following the ROS Discourse on a regular basis, you might have seen a bit more activity on the Aerial Vehicles category than usual. We very recently started an Aerial Robotics Working Group in collaboration with Dronecode Foundation! It will be a community-driven working group initially, but we will hold biweekly meetings on Wednesday at 2:00 PM UTC, and build up a community members and gather information on the ROS Aerial community’s Github organization. This blogpost aims to explain how this working group came to light, what our current plans are and how you can participate.

How did it all begin?

There are actually quite some aerial enthusiasts out there dwelling in the ROS crowd, which became evident when 20-30 people showed up at the impromptu ROScon 2022 aerial roboticists meetup. This was also our first experience with ROScon as Bitcraze, and I (Kimberly) absolutely loved it. The idea popped to be able to be more active in the amazing ROS community, which we started doing with helping out more with the Crazyswarm2 project (see this blogpost) and giving a presentation about it as well. However, we did notice that there wasn’t as much online chatter about Aerial Vehicles on the ROS communication channels. Yes, the Embedded ROS working group led by eProsima (responsible for MicroROS) has done some really cool demos with Crazyflies! And the same goes for any other aerial project, that has probably contributed to some of the other staple projects like NAV2. But there aren’t any working groups that are specific for aerial robotics.

Since PX4 led by Dronecode foundation had similar ambitions to be emerged into the ROS family, since we met in person at the very same ROScon last year, we started talking about possibly starting up a working group. This started with us reaching out to the ROS community for interest with this ROS discourse post and after 25 and more replies, the obvious thing was to set up an first explorative meeting. About 30 people showed up to this, so the message was clear: yes, there is a demand for guidance, structure, and information in the ROS community regarding aerial robotics. Thus, the aerial robotics working group was born!

Current state and plans

One of the observed issues is that we have noticed that is happening is that there there are numerous projects and information about aerial robotics, and perhaps too much. That is because aerial robotics consists of a huge variety of robotic systems in different forms like multicopters or even monocopters (like in the blogpost here) but also hybrid VTOL vehicles, mini blimps (for example this hack we done) and so many more. But as you probably know, aerial vehicles come with their own set of challenges that distinguish them from ground robots, like instability, aerodynamics, and limitations related to their lift capabilities. Therefore, it offers an interesting platform for control theory, autonomy, and swarming and as a result several ROS-related projects have emerged, such as Crazyswarm2, Aerostack2, Kumar Robotics Autonomy Stack and, Agilicious. Moreover, even though a standard ROS interface for aerial robotics has been created some years ago, it has not been enforced or updated since. And also, although courses and tutorials can be found here and there scattered around on multiple projects and autopilot websites to get started with aerial robotics in ROS, but many have found the learning curve to be quite steep and usually don’t know where to start.

Due to the vast amount of systems, software, projects and information out there, we decided to gather all this information in one centralized location as an Aerial Robotics landscape instead of scattering it across various aerial robotics resources, of which we have created a simple repository with markdown files. The idea is to fill this in little by little by info that we get from the working group discussions or other input of users, or research done by ourselves. For that, we will facilitate biweekly meetings, where users will present about their project (like our last meeting about Aerostack 2) or where we engage in discussions on various aerial robotics topics (like Aerial Autonomy stacks in the startup meeting).

Future ambitions

Currently, we don’t have a specific end goal or main project in mind, as we are right at the start of the first discussions and information gathering. That is also why it will be considered a ‘community driven’ working group after some emails back and forth with Open Robotics Foundation, until we reach a stage where the landscape is adequately developed to establish specific development goals. and set up various subprojects for communication, autonomy, platforms and/or education. Additionally, incorporating direct communication protocols within swarms could be of interest, as these are a common use case within aerial robotics. Once we have established more specific development goals, we can apply to be an official ROS working group, and collaborate with other workgroups on overlapping projects. From our perspective, it would be more beneficial for the ROS ecosystem not to create a standalone aerial stack, but enhance the integration of other stacks with aerial vehicles.

Join us!

Currently I (Kimberly) representing Bitcraze and Ramon Roche from Dronecode Foundation will be in the ‘lead’ of the Aerial working group, although we prefer to act as facilitators rather than imposing our own direction. We will try our best not to geek out too much on PX4 and/or Crazyflies alone, so therefore anybody’s input will be crucial! So if you’d like to levitate ROS to new heights, come and join our meetings! Our next meeting is scheduled for Wednesday the 24th of May (2 pm UTC), and you can find the information on this ROS Discourse thread. We hope to see you there!