autonomy

You might remember that at the beginning of this summer, we were invited to do a skill-learning session with the Crazyflie at the Robotics Developer Day 2024 (see this blog post) organized by The Construct. We showed the Crazyflie flying with the multi-ranger deck, capable of mapping the room in both simulation and the real world. Moreover, we demonstrated this with both manual control and autonomous wall-following. Since then, we wanted to make some improvements to the simulation. We now present an updated tutorial on how to do all of this yourself on your own machine.

This tutorial will focus on using the multi-ranger ROS 2 nodes for both mapping and wall-following in simulation first, before trying it out on the real thing. You will be able to tune settings to your specific environment in simulation first and then use exactly the same nodes in the real world. That is one of the main strengths of ROS, providing you with that flexibility.

We have made a video of what to expect of the tutorial, for which you should use this blogpost for the more detailed instructions.

Watch this video first and then again with the instructions below

What do you need first?

You’ll need to setup some things first on the PC and acquire hardware to follow this tutorial in full:

PC preparation

You’ll need to install ROS 2 and Gazebo simulator maintained by the Open Robotics foundation on an Ubuntu machine.

Hardware

You’ll need to components at least of the STEM ranging bundle

If you have any different setup of your computer, it is okay as the demos should be simple enough to work, but, be prepared for some warning/error handling that this tutorial might have not covered.

Time to complete:

This is an approximation of how much time you need to complete this tutorial, depended on your skill level, but if you already have experience with both ROS 2/Gazebo and the Crazyflie it should take 1 hour.

If you have the Crazyflie for the first time, it would probably be a good idea to go through the getting started tutorial and connect to it with a CFclient with the Flowdeck and Multi-ranger deck attached as a sanity check if everything is working before jumping into ROS 2 and Gazebo.

Some things holds for ROS 2! It would be handy to go through the ROS 2 Humble beginner tutorials before starting.

1. Installation

This section will install 4 packages:

Make the workspaces for both simulation and ROS. You can use a different directory for this

mkdir ~/crazyflie_mapping_demo
cd crazyflie_mapping_demo
mkdir simulation_ws
mkdir ros2_ws
cd ros2_ws
mkdir src

Let’s clone the repositories in their right location, starting with simulation

cd ~/crazyflie_mapping_demo/simulation_ws
git clone https://github.com/bitcraze/crazyflie-simulation.gitCode language: JavaScript (javascript)

Then navigate to the ROS2 workspace source folder and clone 3 projects:

cd ~/crazyflie_mapping_demo/ros2_ws/src
git clone https://github.com/knmcguire/crazyflie_ros2_multiranger.git
git clone https://github.com/knmcguire/ros_gz_crazyflie
git clone https://github.com/IMRCLab/crazyswarm2 --recursiveCode language: PHP (php)

First install certain requirements as apt-get packages and pip libraries (might want to make a python environment for the latter)

sudo apt-get install libboost-program-options-dev libusb-1.0-0-dev python3-colcon-common-extensions
sudo apt-get install ros-humble-motion-capture-tracking ros-humble-tf-transformations
sudo apt-get install ros-humble-ros-gzharmonic ros-humble-teleop-twist-keyboard
pip3 install cflib transform3D Code language: JavaScript (javascript)

Also follow the instructions to give the proper rights to the Crazyradio 2.0 in this guide, but if this is your first time of working with the Crazyradio 2.0 first follow this tutorial.

Go to the ros2_ws workspace and build the packages

cd  ~/crazyflie_mapping_demo/ros2_ws/
source /opt/ros/humble/setup.bash
colcon build --cmake-args -DBUILD_TESTING=ONCode language: JavaScript (javascript)

Building will take a few minutes. Especially Crazyswarm2 will show a lot of warnings and std_err, but unless the package build has ‘failed’, just ignore it for now until we have proposed a fix to that repository.

If the build of all the packages passes and non failed, please continue to the next step!

2. Simple mapping simulation

This section will explain how to create a simple 2D map of your environment using the multi-ranger. The ROS 2 package designed for this is specifically made for the multi-ranger, but it should be compatible with NAV2 if you’d like. However, for now, we’ll focus on a simple version without any localization inferred from the map.

Open up a terminal which needs to be sourced for both the gazebo model and the newly build ROS 2 packages:

source ~/crazyflie_mapping_demo/ros2_ws/install/setup.bash
export GZ_SIM_RESOURCE_PATH="/home/$USER/crazyflie_mapping_demo/simulation_ws/crazyflie-simulation/simulator_files/gazebo/"Code language: JavaScript (javascript)

First lets be safe and start with simulation. Startup the ROS 2 launch files with:

ros2 launch crazyflie_ros2_multiranger_bringup simple_mapper_simulation.launch.pyCode language: CSS (css)

If you get a ‘No such file or directory’ error on the model, try entering the full path in GZ_SIM_RESOURCE_PATH export.

Gazebo will start with the Crazyflie in the center. You can get a close-up of the Crazyflie by right-clicking it in the Entity tree and pressing ‘Move to’. You can also choose to follow it, but the camera tracking feature of Gazebo needs some tuning to track something as small as the Crazyflie. Additionally, you will see RVIZ starting with the map view and transforms preconfigured.

Open up another terminal, source the installed ROS 2 distro and open up the ROS 2 teleop keyboard node:

source /opt/ros/humble/setup.bash
ros2 run teleop_twist_keyboard teleop_twist_keyboard

Have the Crazyflie take off with ‘t’ on your keyboard, and rotate it around with the teleop instructions. In RVIZ you should see the map being created and the transform of the Crazyflie moving. You should be able to see this picture, and in this part of the video.

Screenshot of the Crazyflie in Gazebo generating a map with Teleop (video)

3. Simple mapping real world

Now that you got the gist of it, let’s move to the real Crazyflie!

First, if you have a different URI of the Crazyflie to connect to, first change the config file ‘crazyflie_real_crazyswarm2.yaml’ in the crazyflie_ros2_repository. This is a file that Crazyswarm2 uses to know to which Crazyflie to connect to.

Open up the config file in gedit or your favorite IDE like visual code:

gedit ~/crazyflie_mapping_demo/ros2_ws/src/crazyflie_ros2_multiranger/crazyflie_ros2_multiranger_bringup/config/crazyflie_real_crazyswarm2.yamlCode language: JavaScript (javascript)

and change the URI on this line specifically to the URI of your Crazyflie if necessary. Mind that you need to rebuild ros2_ws again to make sure that this has an effect.

Now launch the ROS launch of the simple mapper example for the real world Crazyflie.

source ~/crazyflie_mapping_demo/ros2_ws/install/setup.bash
ros2 launch crazyflie_ros2_multiranger_bringup simple_mapper_real.launch.py
Code language: JavaScript (javascript)

Now open up another terminal, source ROS 2 and open up teleop:

source /opt/ros/humble/setup.bash
ros2 run teleop_twist_keyboard teleop_twist_keyboard

Same thing, have the Crazyflie take off with ‘t’, and control it with the instructions.

You should be able to see this on your screen, which you can also check with this part of the video.
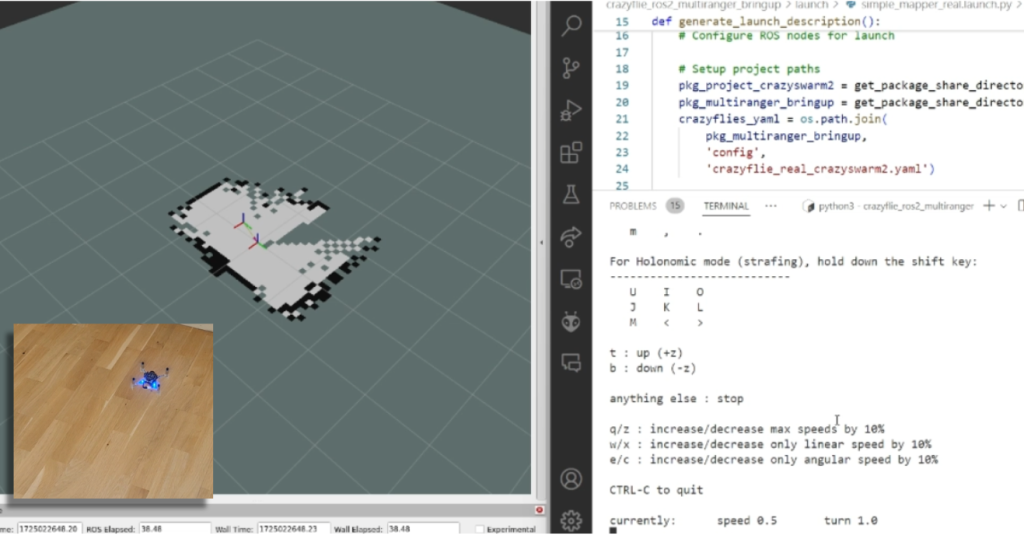
Screen shot of the real Crazyflie mapping while being controlled with ROS 2 teleop (video)

Make the Crazyflie land again with ‘b’, and now you can close the ROS 2 node in the launch terminal with ctrl + c.

4. Wall following simulation

Previously, you needed to control the Crazyflie yourself to create the map, but what if you could let the Crazyflie do it on its own? The `crazyflie_ros2_multiranger` package includes a `crazyflie_ros2_multiranger_wall_following` node that uses laser ranges from the multi-ranger to perform autonomous wall-following. Then, you can just sit back and relax while the map is created for you!

Let’s first try it in simulation, so open up a terminal and source it if you haven’t already (see section of the Simple mapper simulation). Then launch the wall follower ROS 2 launch file:

ros2 launch crazyflie_ros2_multiranger_bringup wall_follower_mapper_simulation.launch.pyCode language: CSS (css)

Take off and wall following will go fully automatic. The simulated Crazyflie in Gazebo will fly forward, stop when it sees a wall with it’s forward range sensor and follow the wall on its left-hand side.

You’ll see on RVIZ2 when the full map is created like here below and this part of the tutorial video.

Screenshot of the simulated Crazyflie in Gazebo mapping will autonomously wall following (video)

You can stop the simulated Crazyflie by the following service call in another terminal that is sourced with ROS 2 humble.

ros2 service call /crazyflie/stop_wall_following std_srvs/srv/Trigger

The simulated Crazyflie will stop wall following and land. You can also just close the simulation, since nothing can happen here.

5. Wall following real world

Now that we have demonstrated that the wall-following works in simulation, we feel confident enough to try it in the real world this time! Make sure you have a fully charged battery, place the Crazyflie on the floor facing the direction you’d like the positive x-axis to be (which is also where it will fly first), and turn it on.

Make sure that you are flying with a room with clear defined walls and corners, or make something with cardboard such as a mini maze, but the current algorithm is optimized to just fly in a squarish room.

Source the ROS 2 workspace like previously and start up the wall follower launch file for the

ros2 launch crazyflie_ros2_multiranger_bringup wall_follower_mapper_real.launch.pyCode language: CSS (css)

Like the simulated Crazyflie, the real Crazyflie will take off automatically and automatically do wall following, so it is important that it is flying towards a wall. It should look like this screenshot, or you can check it with this part of the video.

The real crazyflie wall following autonomously while mapping the room (video).

Be careful here to not accidently run this script with the Crazyflie sitting on your desk!

If you’d like the Crazyflie to stop, don’t stop the ROS2 nodes with ctrl-c, since it will continue flying until crash. It’s not like simulation unfortunately where you can close the environment and nothing will happen. Instead, use the ROS 2 service made for this in a different terminal:

ros2 service call /crazyflie_real/stop_wall_following std_srvs/srv/Trigger

Similar the real Crazyflie will stop wall following and land. Now you can close the ROS 2 terminals and turn off the crazyflie.

Next steps?

We don’t have any more demos to show but we can give you a list of suggestions of what you could try next! You could for instance have multiple Crazyflies mapping together like in the video shown here:

This uses the mapMergeForMultiRobotMapping-ROS2 external project, which is combined with Crazyswarm2 with this launch file gist. Just keep in mind that, currently, it would be better to use a global positioning system here, such as the Lighthouse positioning system used in the video. Also, if you’d like to try this out in simulation, you’ll need to ensure different namespaces for the Crazyflies, which the current simulation setup may not fully support.

Another idea is to connect the NAV2 stack instead of the simple mapper. There exists a couple of instructions on the Crazyswarm2 ROS2 tutorials so you can use those as reference. Check out the video below here.

Moreover, if you are having difficulties setting up your computer, I’d like to remind you that the skill-learning session we conducted for Robotics Developer Day was entirely done using a ROSject provided by The Construct, which also allows direct connection with the Crazyflie. The only requirement is that you can run Crazyswarm2 on your local machine, but that should be feasible. See the video of the original Robotics Developer Day skill-learning session here:

The last thing to know is that the ROS 2 nodes in this tutorial are running ‘offboard,’ so not on the Crazyflies themselves. However, do check out the Micro-ROS examples for the Crazyflie by Eprosima whenever you have the time and would like to challenge yourself with embedded development.

That’s it, folks! If you are running into any issues with this tutorial or want to bounce some cool ideas to try yourself, start a discussion thread on https://discussions.bitcraze.io/.

Happy hacking!

A few years ago, we wrote a blogpost about the Commander framework, where we explained how the setpoint structure worked, which drives the controller of the Crazyflie, which is an essential part of the stabilization module. Basically, without these, there would not be any autonomy on the Crazyflie, let alone manual flight.

In the blogpost, we already shed some light on where different setpoints can come from in the commander framework, either from the Crazyflie python library (externally with the Crazyradio), the high level commander (onboard) or the App layer (onboard).

General framework of the stabilization structure of the crazyflie with setpoint handling. * This part is takes place on the computer through the CFlib for python, so there is also communication protocol in between. It is left out of this schematics for easier understanding.

However, we notice that there is sometimes confusion regarding these different functionalities and what exactly sends which setpoints and how. These details might not be crucial when using just one Crazyflie, but become more significant when managing multiple drones. Understanding how often your computer needs to send setpoints or not becomes crucial in such scenarios. Therefore, this blog post aims to provide a clearer explanation of this aspect.

Sending set-points directly from the CFlib

Let’s start at the lower level from the computer. It is possible to send various types of setpoints directly from a Python script using the Crazyflie Python library (cflib for short). This capability extends to tasks such as manual control:

send_setpoint(roll, pitch, yawrate, thrust)

or for hover control (velocity control):

send_hover_setpoint(vx, vy, yawrate, zdistance)

You can check the automatic generated API documentation for more setpoint sending options.

If you use these functions in a script, the principle is quite basic: the Crazyradio sends exactly 1 packet with this setpoint over the air to the Crazyflie, and it will act upon that. There are no secret threads opening in the background, and nothing magical happens on the Crazyflie either. However, the challenge here is that if your script doesn’t send an updated setpoint within a certain amount of time (default of 2 seconds), a timeout will occur, and the Crazyflie will drop out of the sky. Therefore, you need to send a setpoint at regular intervals, like in a for loop, to keep the Crazyflie flying. This is something you need to take care of in the script.

Example scripts in the CFlib that are sending setpoints directly:

Setpoint handling through Motion Commander Class

Another way to handle the regular sending of setpoints automatically in the CFLib is through the Motion Commander class. By initializing a Motion Commander object (usually using a context manager), a thread is started with takeoff that will continuously send (velocity) setpoints at a fixed rate. These setpoints can then be updated by the following functions, for instance, moving forward with blocking:

forward(distance)

or a giving body fixed velocity setpoint updates (that returns immediately):

start_linear_motion(vx, vy, vz, rate_yaw)

You can check the Motion Commander’s API-generated documentation for more functions that can be utilized. As there is a background thread consistently sending setpoints to the Crazyflie, no timeout will occur, and you only need to use one of these functions for the ‘behavior update’. This thread will be closed as soon as the Crazyflie lands again.

Here are example scripts in the CFlib that use the motion commander class:

Setpoint handling through the high level commander

Prior to this, all logical and setpoint handling occurred on the PC side. Whether sending setpoints directly or using the Motion Commander class, there was a continuous stream of setpoint packets sent through the air for every movement the Crazyflie made. However, what if the Crazyflie misses one of these packets? Or how does this stream handle communication with many Crazyflies, especially in swarms where bandwidth becomes a critical factor?

This challenge led the developers at the Crazyswarm project (now Crazyswarm2) to implement more planning autonomy directly on the Crazyflie itself, in the form of the high-level commander. With the High-Level Commander, you can simply send one higher-level command to the Crazyflie, and the intermediate substeps (setpoints) are generated on the Crazyflie itself. This can be achieved with a regular takeoff:

take_off(height)

or go to a certain position in space:

go_to(x, y)

This can be accomplished using either the PositionHLCommander, which can be used as a context manager similar to the Motion Commander (without the Python threading), or by directly employing the functions of the High-Level Commander. You can refer to the automated API documentation for the available functions of the PositionHLCommander class or the High-Level Commander class.

Here are examples in the CFlib using either of these classes:

Notes on location of autonomy and discrepancies

Considering the various options available in the Crazyflie Python library, it’s essential to realize that these setpoint-setting choices, whether direct or through the High-Level Commander, can also be configured through the app layer onboard the Crazyflie itself. You can find examples of these app layer configurations in the Crazyflie firmware repository.

It’s important to note some discrepancies regarding the Motion Commander class, which was designed with the Flow Deck (relative positioning) in mind. Consequently, it lacks a ‘go to this position’ equivalent. For such tasks, you may need to use the lower-level send_position_setpoint() function of the regular Commander class (see this ticket.) The same applies to the High-Level Commander, which was primarily designed for absolute positioning systems and lacks a ‘go forward with x m/s‘ equivalent. Currently, there isn’t a possibility to achieve these functionalities at a lower level from the Crazyflie Python library as this functionality needs to be implemented in the Crazyflie firmware first (see this ticket). It would be beneficial to align these functionalities on both the CFlib and High-Level Commander sides at some point in the future.

Hope this helps a bit to explain the commander frame work in more detail and where the real autonomy lies of the Crazyflie when you use different commander classes. If you have any questions on what the Crazyflie can do with these, we advise you to ask your questions on discussions.bitcraze.io and we will try to point you in the right direction and give examples!

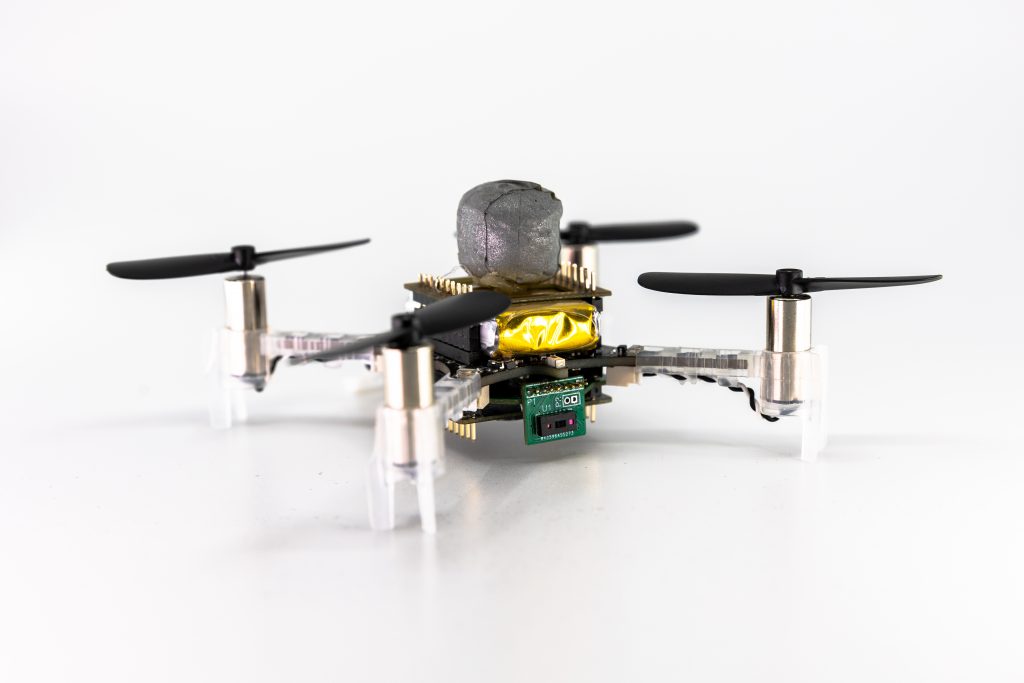
The Flow deck has been around for some time already, officially released in 2017 (see this blog post), and the Flow deck v2 was released in 2018 with an improved range sensor. Compared to MoCap positioning and the Loco Positioning System (based on Ultrawideband) that were already possible before, optical flow-based positioning for the Crazyflie opened up many more possibilities. Flight was no longer confined to lab environments with set-up external systems; people could bring the Crazyflie home and do their hacking there. Moreover, doing research for exploration techniques that cannot rely on external positioning systems was possible with it as well. For example, back in my day as a PhD student, I relied heavily on the Flow deck for multi-Crazyflie autonomous exploration. This would have been very difficult without it.

However, despite the numerous benefits that the Flow deck provides, there are also several limitations. These limitations may not be immediately familiar to many before purchasing a Crazyflie with a Flow deck. A while ago, we wrote a blog post about positioning systems in general and even delved into the Loco Positioning System in detail. In this blog post, we will explore the theory of how the Flow deck enables the Crazyflie to fly, share general tips and tricks for ensuring stable flight, and highlight what to avoid. Moreover, we aim to make the Flow deck the focus of next week’s Developer meeting, with the goal of improving or clarifying its performance further.

Theory of the Flow deck

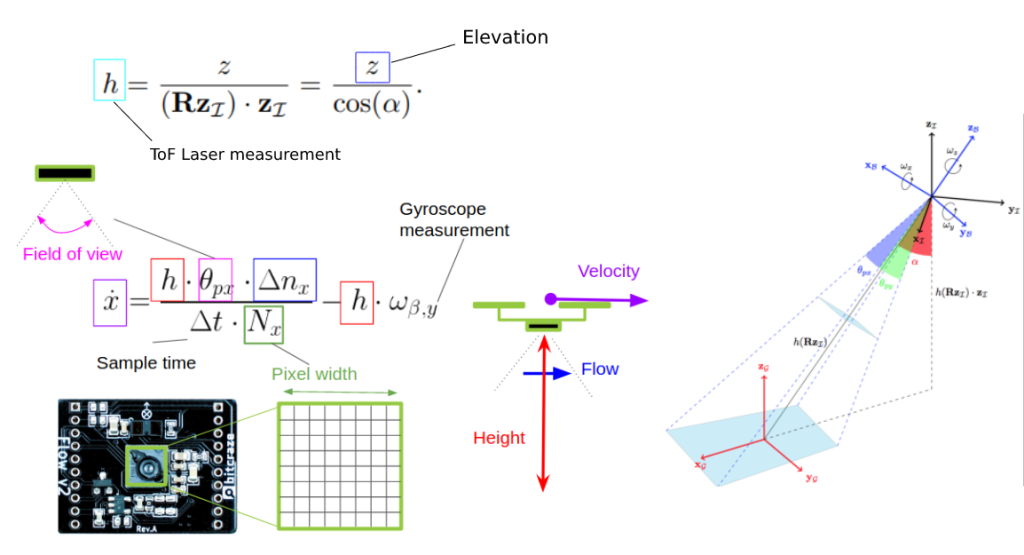
I won’t delve into too much detail but will provide a generic indication of how the Flow deck works. As previously explained in the positioning system blog post, the Flow deck is a relative positioning system with onboard estimation. “Relative” means that wherever you start is the (0, 0, 0) position. The extended Kalman filter processes flow and height information to determine velocity, which is then integrated to estimate the position—essentially dead reckoning. The onboard Kalman filter manages this process, enabling the Crazyflie to use the information for stable hovering.

Image from Positioning System Overview blogpost

The optical flow sensor (PMW3901) calculates pixel flow per frame (this old blog post explains it well), and the IR range sensor (VL53L1x) measures height up to 4 meters (under ideal conditions). The Kalman filter incorporates a measurement model that describes the relationship between these two values and the velocity of the Crazyflie. More detailed information can be found in the state estimation documentation. This capability allows the Crazyflie to hover, as explained in the getting started tutorial.

Image from state estimation repo documentation

Tips & Tricks and Limitations

If you want to fly with the Crazyflie and the Flow deck, there are a couple of things to take in mind:

  • Take off from a floor with texture. Natural texture like wood flooring is probably the best.
  • The floor shouldn’t be too shiny, and be aware of infrared scattering for the height sensor
  • The room should be well-lit, as the sensor needs to see the texture.

There are certain situations that the Flow deck has some issues with:

  • Low or no texture. Flying above something that is only one plain color
  • Black areas. Similar reason to flying above no texture, but it’s more difficult than usual. Especially with startup, the position estimate diverges
  • Low light conditions
  • Flying over its own shadow

We made a video that shows these types of behaviors, starting of course with the most ideal flying conditions:

Moreover, it is also important to note that you shouldn’t fly too high or yaw too often. The latter will make the Crazyflie drift, as the optical flow cannot be distinguished as being caused by the yaw movement.

Developer meeting about Flow deck

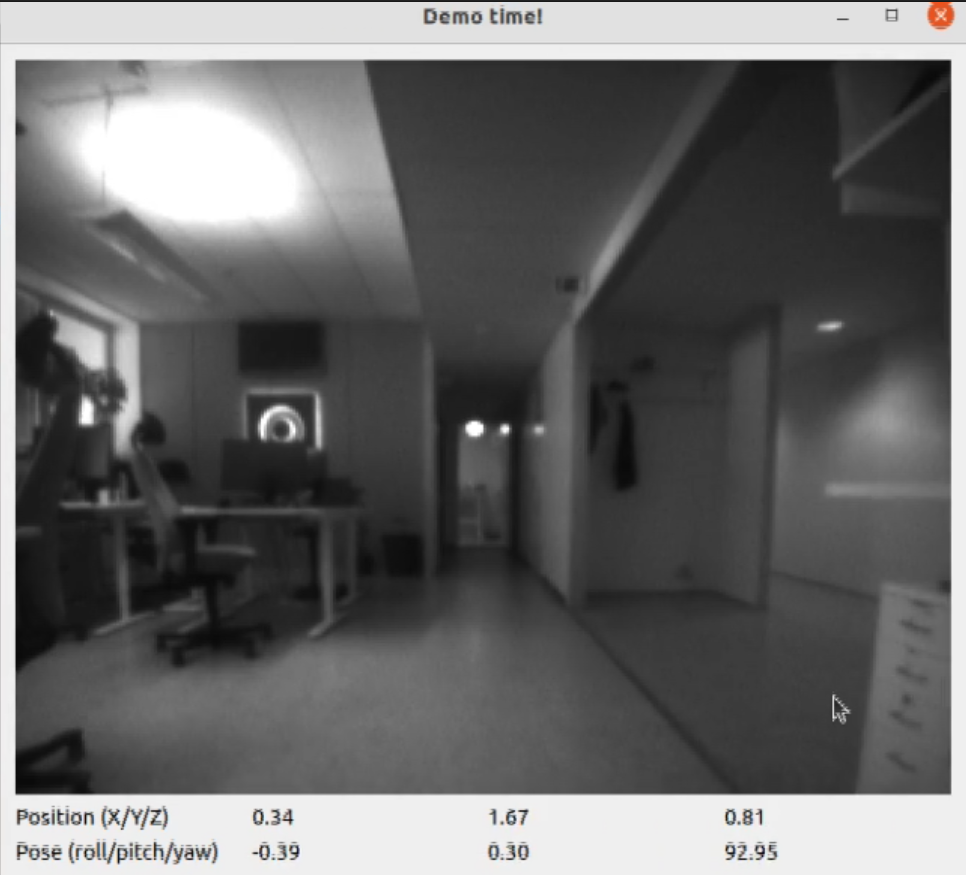
We believe that many of the issues people experience are primarily due to the invisibility of the positioning quality. In many of our examples, the Crazyflie will not take off if the position is stable. However, we don’t have a corresponding functionality in our CFclient, as it is more up to the user to recognize when the positioning is diverging. There is a lot of room for improvement in this regard.

This is the reason why the next developer meeting will specifically focus on the Flow deck, which will be on Wednesday the 6th of December, 3 pm central European time. During the meeting, we will explain more about the Flow deck, discuss the issues we are facing, and explore ways to enhance the visibility of positioning quality. Check out this discussion thread for information on how to join.

As of this year around March/April we started with both Bitcraze developer meetings and Aerial-ROS meetings (the latter in collaboration with Dronecode Foundation). Now that summer is around and our office is a bit empty, we had a bit of a summer break, however we will start the meetings back up again soon! The next ROS-aerial meeting will be on the 16th of August and we will also have a Bitcraze developer meeting planned on the Wednesday the 6th of September (keep an eye on our announcements in discussions). In this blogpost we like to take the opportunity to show an overview of the meetings we had so far.

Aerial ROS meetings

In March we started a [ROS community working group] for aerial Vehicles together with our friends at Dronecode foundation, aka Aerial-ROS! We have biweekly meetings with some standard discussion meetings (with a topic) and with an invited guest presentation.

Here are the discussion topic meetings we had:

And we had several guest speakers as well! Like Miguel Fernandez-Cortizas from CAR-UPM talking about Aerostack2:

ROS-aerial Meeting guest presentation about Aerostack2

Then we had a guest presentation from Gerald Peklar from NXP talking about the Drones4Bats project:

ROS-aerial Meeting guest presentation about Drones4Bats

And the last before the summer was from Alejandro Hernández Cordero (Open Robotics Consultant) about the ROS2 Project Vehicle Gateway.

ROS-aerial Meeting guest presentation about Vehicle Gateway

The next meeting for ROS-aerial is planned on the 16th of August. Keep an eye on the ROS discourse forum.

Bitcraze Developer Meetings

We already had a couple of developer meetings before but we started recording them since April. The first recorded one was about the loco positioning system. Here first we gave a presentation about the system itself, with the latest developments cooking in our pot and time for questions afterwards.

Dev meeting about Loco positioning.

Then we had a meeting about the development of safety features in the Crazyflie in light of the Bolt developments:

Bitcraze Dev meeting about Safety features.

Then we had a meeting where Kristoffer highlighted the autonomous swarm demo we showed at ICRA 2023.

Bitcraze dev meeting about the autonomous swarm demo

And the last before the summer holiday, we had a meeting where Kimberly explained about the Crazyflie simulationmodel intergrated into Webots

Bitcraze Dev meeting about Simulation

We are still planning to have developer meeting every first wednesday of the month starting with September 6th (keep an eye on our announcements in discussions).

EPFL 101 Crazyflie presentation

Oh yeah, by the way, we also were invited by the EPFL-lis lab to give another Crazyflie 101 presentation in Lausanne last April! We made a prerecording of it so you can check it out right here:

EPFL LIS crazyflie 101 presentation.

See you all after summer!

This weeks guest blog post is from Hanna Müller, Vlad Niculescu and Tommaso Polonelli, who are working with Luca Benini at the Integrated Systems Lab and Michele Magno at the Center for Project-Based Learning, both at ETH Zürich. Enjoy!

This blog post will give you some insight into our current work towards autonomous flight on nano-drones using a miniaturized multi-zone depth sensor. Here we will mainly talk about obstacle avoidance, as it is our first building block towards fully autonomous navigation. Who knows, maybe in the future, we will have the honor to write another blog post about localization and mapping ;)

A Crazyflie 2.1 with our custom multi-zone ToF deck, a flow deck and a vicon marker.

Obstacle avoidance on nano-drones is challenging, as the restricted payload limits on-board sensors and computational power. Most approaches, therefore, use lightweight and ultra-low-power monocular cameras (as the AI-deck) or 1d depth sensors (as the multi-ranger deck). However, both those approaches have drawbacks – the camera images need extensive processing, usually even neural networks to detect obstacles. Neural networks additionally need training data and are prone to fail in completely new scenarios. The 1d depth sensors can reliably detect obstacles in their field of view (FoV); however, no information about the size or exact position of the obstacle is obtained.


On bigger drones, usually lidars or radars are used, but unfortunately, due to the limited weight and power consumption, those cannot be carried and used on nano-drones. However, in 2021 STMicroelectronics introduced a new multi-zone Time-of-Flight (ToF) sensor – with maximal 8×8 pixel resolution, a range up to 4m (according to the datasheet), a small form-factor and low power consumption of only 286mW (typical) it is ideal to use on nano-drones.


In the picture on top, you can see the Crazyflie 2.1 with our custom ToF deck (open-sourced at https://github.com/ETH-PBL/Matrix_ToF_Drones). We described this deck for the first time in [1], together with a sensor characterization. From this, we saw that we could use the sensor in different light conditions and on different colored obstacles, but from 2m on, the measurements started to get incomplete in all scenarios. However, as the sensor can detect invalid measurements (due to interference or obstacles being out of range), we can still rely on our information. In [2], we presented the system and some steps towards obstacle avoidance in a demo abstract, as you can see in the video below:

The next thing we did was to collect a dataset – we flew with different combinations of decks (flow-deck v2, AI-deck, our custom multi-zone ToF deck) and sometimes even tracked by a vicon system. Those recordings amount to an extensive dataset with depth images, RGB images, internal state estimation and the position and attitude ground truth.


We then fed the recorded data into a python simulation to develop an obstacle avoidance algorithm. We focused on only the ToF data (we are not fusing with the camera in this project, we just provide the data for future work). We aimed for a very efficient solution – because we want it to run on-board, on the STM32F405, with low latency and without occupying too many resources. Our algorithm is very lightweight but highly effective – we divide the FoV in different zones, according to how dangerous obstacles in those areas are and then use a decision tree to decide on a steering angle and velocity.


With only using up 0.31% of the computational power and 210 μs latency, we reached our goal of developing an efficient obstacle avoidance algorithm. Our system is also low-power, the power to lift the additional sensor with all accompanying electronics as well as the supply of it totals in less than 10% of the whole drone. On average, our system reaches a flight time of around 7 minutes. We refer to our preprint [3] for details on our various tests – they include flights with distances up to 212 m and 100% reliability and high agility at a low speed in an office environment.

As our paper is currently submitted but not yet accepted our code and dataset are not yet released – however, the hardware design is already accessible: https://github.com/ETH-PBL/Matrix_ToF_Drones

[1] V. Niculescu, H. Müller, I. Ostovar, T. Polonelli, M. Magno and L. Benini, “Towards a Multi-Pixel Time-of-Flight Indoor Navigation System for Nano-Drone Applications,” 2022 IEEE International Instrumentation and Measurement Technology Conference (I2MTC), 2022, pp. 1-6, doi: 10.1109/I2MTC48687.2022.9806701.
[2] I. Ostovar, V. Niculescu, H. Müller, T. Polonelli, M. Magno and L. Benini, “Demo Abstract: Towards Reliable Obstacle Avoidance for Nano-UAVs,” 2022 21st ACM/IEEE International Conference on Information Processing in Sensor Networks (IPSN), 2022, pp. 501-502, doi: 10.1109/IPSN54338.2022.00051.
[3] H.Müller, V. Niculescu, T. Polonelli, M. Magno and L. Benini “Robust and Efficient Depth-based Obstacle Avoidance for Autonomous Miniaturized UAVs”, submitted to IEEE, preprint: https://arxiv.org/abs/2208.12624

Before the summer vacations, I had the opportunity to spend some time working on AI deck improvements (blog post). One of the goals I set was to get CRTP over WiFi working, and try to fix issues along the way. The idea was to put together a small example where you could fly the Crazyflie using the keyboard and see the streamed image along the way. This would require both CRTP to the Crazyflie (logging and commands) as well as CPX to the GAP8 for the images. Just before heading off to vacation I managed to get the demo working, this post is about the results and som of the things that changed.

Link drivers

When using the Crazyflie Python library you connect to a Crazyflie using a URI. The first part of the URI (i.e radio or usb) selects what link driver to use for the connection. For example radio://0/80/2M/E7E7E7E7E7 selects the radio link driver, USB dongle 0 and communication at 2Mbit on channel E7E7E7E7E7.

While working on this demo there were two major things changed in the link drivers. The first one was the implementation of the serial link (serial://) which is now using CPX for CRTP to the Crazyflie. The usecase for this link driver is to connect a Raspberry Pi via a serial port to the Crazyflie on a larger platform.

The second change was to add a new link driver for connecting to the Crazyflie via TCP. Using this link driver it’s possible to connect to the Crazyflie via the network. It’s also possible to get the underlying protocol, the CPX object, for using CPX directly. This is used for communicating with for example the GAP8 to get images.

In the new TCP link driver the URI starts with tcp:// and has either an IP or a host name, followed by the port. Here’s two examples:

  • tcp://aideck-AABBCCDD.local:5000
  • tcp://196.168.0.100:5000

Comparison with the Crazyradio PA

So can WiFi be used now instead of the Crazyradio PA? Well, it depends. Using WiFi will give you larger throughput but you will trade this for latency. In our tests the latency is both larger and very random. In the demo I fly with the Flow V2 deck, which means latency isn’t that much of an issue. But if you were to fly without positioning and just use a joystick, this would not work out.

The Demo!

Below is a video of some flying at our office, to try it out yourself have a look at the example code here. Although the demo was mostly intended for improving CPX, we’ve made use of it at the office to collect training data for the AI deck.

The Crazyflie with AIdeck during over WiFI controlled flight.

Improvements

Unfortunately I was a bit short on time and the changes for mDNS discovery never made it it. Because of this there’s no way to “scan” or discover AI decks, so to connect you will need to know the IP or the host name. For now you can retrieve that by connecting to your AI-deck equipped Crazyflie with the CFclient and look at the console tab.

A part from that there’s more improvements to be made, with a better structure for using CPX (more like the CRTP stack with functions) in the library and more examples. There’s also still a few bugs to iron out, for example there’s still the improved FPS and WiFi throughput issues.

IMAV 2022

Next week from 13th to 16th of September Barbara, Kristoffer and Kimberly will be present at the international Micro Aerial Vehicle Conference and Competition (IMAV) hosted by the MAVlab of the TU Delft in the Netherlands. One of the competitions is called the nano quadcopter challenge, where teams will program a Crazyflie + AI deck combo to navigate through an obstacle field, so we are excited to see what solutions will come out of that. If any of you happens to be at the conference/competition, drop by our table to say hello!